Pages

Blog post updated : no update

Thursday, December 27, 2007

The Crestock Photoshop Contest 2007 - Creative!

You should check this out, the Crestock Photoshop Contest 2007. The contest was already end anyway and the winner already announced.

The rule is simple, for each round, Crestock supplied a set of source photos from their image library. The contestants were free to edit/modify the image as creative as they can.

Ok, check out the:-
I was totally impressed with all the winners above. Creative, skillful and of course, knowledge and experience is the important element to achieve that level.

Fuuhhh..it looks that I need to work hard in order to design great image..hehe..

That's all..yeahh!!!

Wednesday, December 19, 2007

How to get Blogger.com image URL?

Hmm..another simple tip for Blogspot user. This time, I'd like to show you how easy it is to get the image URLs in Blogger. As we know, all images that we've uploaded through the blog post was stored in Blogger database. And of course, you can delete them.

But why do you need the image URLs?

There are several reasons:-
  • To place the image permanently on your blog sidebar
  • To get the full size image (I used it in my tutorials section)
  • Use it for blog background image
  • Submit the URL to forum, email, comment box etc..
and so on..

As for example, I've upload my Gmail signature (image above). And this is what I got in the HTML mode:-

<a onblur="try {parent.deselectBloggerImageGracefully();} catch(e) {}" href="http://bp3.blogger.com/_-NP5DNrjW60/R2iH1VaQlqI/AAAAAAAAAoA/
sWnxavlCThc/s1600-h/dxcontact.gif
"><img style="margin: 0px auto 10px; display: block; text-align: center; cursor: pointer;" src="http://bp3.blogger.com/_-NP5DNrjW60/R2iH1VaQlqI/AAAAAAAAAoA/
sWnxavlCThc/s320/dxcontact.gif
" alt="" id="BLOGGER_PHOTO_ID_5145511924620891810" border="0" /></a>


As you can see, there are two image URLs above; red and blue.

When and how to use it?

If you want to submit the URL to forum, email or comment box, use the red one. Just place the URL directly to the forum textarea.

And if you want to use it as an image for your blog sidebar or background, use the blue one. To use it, simply paste it in this single line code:-

<img src="blue URL" />

See, it's easy right?

Other than that, the top reason why you should use the image in Blogger.com is that it has an unlimited bandwidth. It's different from your uploaded image in Google Pages, where it has a limited bandwidth.

I think that's all for now. Still working for my new blog template. Hehe..

Friday, December 14, 2007

NVIDIA GeForce 8800 Demo (video)

Ok, check out the demonstration video of NVIDIA GeForce 8800 graphics card, the world’s first DirectX® 10 GPUs. It is one of the GeForce 8 Series family.


"The wait is over. Awesome power. Awesome price."

Hmm..by the way, you can read the review and benchmarking results of GeForce 8800 GTS 512MB, the latest graphics card in GeForce 8 Series.

That's all..yeahh!!!

Thursday, December 13, 2007

Download Glassy Apple (Wallpaper)

[ Download | 1280 x 1024 ]

Ok, another wallpaper designed by me. I use my drawing and tracing skills to create this wallpaper. At first, I'd like to add some busy image design for the background, but it was really sucks. I never like some complicated and "too busy" design. I will stick to my simplicity concept.

Check out the details:-

Name: Glassy Apple
Type: Wallpaper
File Format: JPEG
Dimensions: 1280 x 1024
Theme: Apple
File size: 123 KB
Date created: Dec 12, 07
Software: Adobe Illustrator
Color: Grey, White, Black
Background Color:
  • HEX: #262626
  • RGB: 38, 38, 38

Extract the file using WinRAR.

That's all..Yeahh!!!

Wednesday, December 12, 2007

Windows XP - Create one click shutdown shortcut

Let’s go for XP tip for today. But before that, as you can see, I have used a custom domain for my blog. I’ve moved my blog from http://dx-xel.blogspot.com/ to http://dx-xel.net/. All of my previous blog URLs will be redirect to my brand new domain. It was pretty cool. Hehe.. Next time, I will show you step by step on how I move my blog to my own domain.

Ok, back to the topic. This is how you can create a shortcut on your desktop and when ever you click at it, your Windows will be shutdown.

Step 1

Right click on your desktop > New > Shortcut


Step 2

You will see a pop-up window. Enter SHUTDOWN -s -t 01

Note: Enter c:\windows\rundll.exe user.exe,exitwindows (if you’re using Windows95, Windows98 or ME)

Click the Next button and name the shortcut as Shutdown, Turn Off, Stop or whatever. Then click Finish. DONE.

Optional:

1. You can make a keyboard shortcut for that icon and by pressing them, you will be able to shutdown Windows. Right click to that shortcut icon > Properties. Click the Shortcut key’s textbox and press the combination of keys that you prefer (e.g. Ctrl-Alt-Q)

Click the Apply button and then OK.

2. You also can change the shortcut icon. (Image at the top). Right click to the shortcut > Properties and click the Change Icon… button. Select any icon you prefer, click OK. Then, click the Apply and OK button.

By now, you should be able to shutdown Windows with a single click. That’s all for today…Yeahh!!!

Credits: Wowarea

Friday, December 7, 2007

Desktoptopia - Feed your creativity

Desktoptopia is a desktop background manager for the Apple Mac user. I'm a Windows user for sure but that's not the point.

As a designer(not really), I'm really impress of all the artworks right there and feel some kind of envy when looking at their high quality design. Fuhh..it's look that I'm still far behind them. I'm still thinking the best way to improve my skills and really hope that I can find a job in the graphics designer area. It was a pretty tough to compete with a lot of skillful designers out there.

By the way, I've decided to submit my design at Desktoptopia next time. Hope they will accept my artworks. Hehe..

That's all for today!!! Have fun!!!

Wednesday, December 5, 2007

How to delete image or picture in Blogger?

"Oppsss...I have uploaded a wrong picture!! &^%#&#!!" Yeah..it sounds familiar. It also happened to me. It's not a big deal if you've upload a 100kb or 300kb image. But, how about 3mb or 5mb? As we know, Blogger only provide 1024mb free space to store your picture.

Of course, you can delete your new post including the image that you have just uploaded. Then, how about the old posts? Do you want to delete them just because it has the photo of your old fashion hair style??

No worries guys. Normally all images that we have uploaded was stored in the blogger.com database. And the only way (I guess) to access all of them is in the Picasa Web Album. Just open that link. You'll see the Albums based on how many blog you've created. If you have created 3 blogspot blog using the same account, then you should have 3 Albums.

If you still confuse on how to use the Picasa Web Album to delete your image, just follow these simple steps:-

Step 1

Click to your blog's Album which you want to delete a picture on it. You may see something like below:-

Note: If you want your image to display a little faster, just click on the Size: Small Thumbnails (on the right side of the page)


Step 2

Click on the image that you want to delete. The image should be in a single page right now. Go to the right sidebar menu and click Delete this photo.

You will see a confirmation message. Press Ok to delete your picture. DONE.

Note: The picture will no longer appear in your blog.

This step was useful if you only want to delete one image. If you want to delete a multiple images, go to Organise (image on step 1). Then you will see a thumbnails images. Hold down the Ctrl key and click on multiple photos to select them. After that click the Delete button. As simple as that.

The advantage of deleting your image is that you can save a lot of space in your blogger account. Another good tips to save your image space is try to use the .gif file format instead of .bmp and resize your image to 300x300px or 400x400px.

From May 23, 07 until now, I'm currently using 5MB (0.56%) of my 1024 MB storage with 257 uploaded photos.

That's all for today!!!

Note: You also can purchase additional storage from Google if you have out of free space.

Friday, November 30, 2007

IE Tab - Display Internet Explorer in Firefox's tab

IE Tab is a great Firefox extension. Yeah..you can easily view how your page displayed in IE with just one click and then switch back to Firefox. You can switch it on the right click context menu (image above), status bar or just place it beside your homepage button.

Ok, I'll show you how to place it beside your homepage button:-

Step 1

Install IE Tab extension and restart your Firefox. (To restart, just close and reopen your Firefox browser)


Step 2

Go to View > Toolbars > Customize...You will see something like below:-

Click and drag the IE Tab button and drop it beside the homepage button. It should be look like this:-
Ok, DONE.

Now, mouse over the IE Tab button to see the text tool tips. It will tell you:-
  • Left click: Switches the rendering engine for the current page
  • Middle click: Switches the rendering engine in a new tab
  • Right click: Show IE Tab Sites Filter (IE Tab options)
This is a great tool for web developers/designers to view how their web page displayed in IE in a single click. It was really helpful for me right now because I'm working for my new blogger template.

That's all for today..have fun!!

Official website: Mozdev.org-IE Tab

Thursday, November 29, 2007

CCleaner - Clean up junk files and invalid Registry entries

Yeahh..the title says it all. CCleaner is a freeware system optimization and privacy tool. It removes unused files from your system - allowing Windows to run faster and freeing up valuable hard disk space.

I've installed and used this software. Yea..it's really fast and taking less than a second to run. Beside that, it will prompt you to save your Registry first if you want to fix or delete them.

Cleans the following:
  • Internet Explorer Cache, History, Cookies, Index.dat.

  • Recycle Bin, Temporary files and Log files.

  • Recently opened URLs and files.

  • Third-party application temp files and recent file lists (MRUs).
    Including: Firefox, Opera, Media Player, eMule, Kazaa, Google Toolbar, Netscape, Office XP, Nero, Adobe Acrobat, WinRAR, WinAce, WinZip and more...

  • Advanced Registry scanner and cleaner to remove unused and old entries.
    Including File Extensions, ActiveX Controls, ClassIDs, ProgIDs, Uninstallers, Shared DLLs, Fonts, Help Files, Application Paths, Icons, Invalid Shortcuts and more... Backup for registry clean.

  • Windows Startup tool.

Hmm..I think that's all for today..

Fell free to download CCleaner.

Credits: FileHippo

Wednesday, November 28, 2007

Download XeL-Green Xbox (Wallpaper)

[ Download | 1152x864]

Hmm..this time I'm trying my best to draw the Xbox logo using the green and yellow color. Note that I've changed the prefix of the wallpaper name because there are some people are looking for the "dx wallpaper" and landing on my blog. I'm pretty sure that they're looking for the D-Generation X wallpaper. And obviously, my design is not related to that stuff and maybe someday I will design my wallpaper based on the wrestling theme. Hehe..

Check out the details:-

Name: XeL-Green Xbox
Type: Wallpaper
File Format: JPEG
Dimensions: 1152 x 864
Theme: XBOX
File size: 207 KB
Date created: Nov 27, 07
Software: Adobe Illustrator
Color: Green, Yellow
Background Color:
  • HEX: #103108
  • RGB: 16, 49, 8
Extract the file using WinRAR.

That's all..Yeahh!!!

Saturday, November 24, 2007

Download Foxkeh wallpapers

Hmm..nice wallpapers. What else can I say. By the way, Foxkeh is a mascot character for Firefox promotions organized by Mozilla Japan. It was a calendar wallpapers anyway. I really like the variety of colors they used for the wallpaper background.

Feel free to download Foxkeh's wallpapers.

That's all for today!!!

Thursday, November 22, 2007

Windows XP - Remove cached run command lists

Ok, a quick Win XP tip for today. Maybe some of you guys has been using a lot of windows run commands and would like to remove the cached lists (image above).

Here is how you can easily delete or get rid of them:-

Step 1

Open your Registry Editor. Go to Start>Run (Windows+R), type regedit and press ENTER.


Step 2

Navigate to the following key:-

HKEY_CURRENT_USER/Software/Microsoft/Windows/CurrentVersion/
Explorer/RunMRU


Ok, by now, you should see the value corresponding to the command that you have used. To remove it, just right click (the one with label a, b, c, d and so on) and select Delete. See image below:-

Restart your machine. Your cached run commands should be gone right now.

That’s all. Yeahh!!!

Credits: Wowarea

Wednesday, November 21, 2007

Blogger - Save and backup your template

It is really important to backup your blogger template. Whether you’d like to add some HTML code or some cool widget in the code area, this thing you should not leave it behind. Or you will be end up with a frustration feeling. Hehe..

Ok, this is how you can easily backup your blog template. (From now on, I’ll be posting a blogger tips for both versions – classic and new blogger)

For Classic Blogger

Go to Dashboard > Template > Edit HTML. You will see some HTML code page (inside the frame). Click inside the frame, select all (Ctrl+A), and then copy (Ctrl+C). See image below:-

Open a blank Notepad file and paste (Ctrl+V) it right there. Save your file as mybackuptemplate.txt or anything you want. DONE.

Note: To use the backup template (restore), simply copy the backup code and paste it inside the frame (replace the current template).


For New Blogger

Go to Dashboard > Layout > Edit HTML. You will see something like below:-

Click on Download Full Template and it will save your template into hard drive with the .xml extension. Rename it as mybackuptemplate.xml. DONE.

Note: To use the backup template, simply click the Browse button, locate your saved file (.xml) and click the Upload button.


Right now, you shouldn’t be worry if something terrible happen on your blog HTML code while you are working on it.

That’s all for today. Yeahh!!

Thursday, November 15, 2007

Windowpaper XP - Customize XP folder

Hehe..last time I've posted about how to customize XP folder background using IESHWIZ. I thought that it might be quite difficult to follow for those who are new at Win XP. No worry, this time I've found a great free software;Windowpaper XP, for you to use to customize your folder.

Windowpaper XP lets you customize the background of your folders with wallpapers in the same way, you can customize your desktop.

Other than that, it allows you to select a custom background image for any folder you want (including subfolders), specify the font color and instantly preview the results.

Check out this screenshot:-

I've tried to customize my "test" folder on my desktop using blue background and white text color. It was really easy to use this software. Just follow the step by step instruction on the right side of this software.

Step 1: Select a folder to modify (Check the checkbox to include subfolders)
Step 2: Choose a background (You can only select either using image or color)
Step 3: Choose a color for your icon text

And then, click the Folder icon beside the Default button to see a changes. If you satisfied with it, click Exit and DONE.

If you want to restore everything to default, select the folder and just click the Default button.

Feel free to download Windowpaper XP

I think that's all for today. Yeahh!!

Monday, November 12, 2007

Gmail IMAP for the iPhone

Ok, let's learn how to set up Gmail IMAP on the iPhone in about a minute. Check out this video:-


Further info: Learn how to set up IMAP on other devices.

Friday, November 9, 2007

Edit whatever you want on ANY web page (Javascript)

Last time I wrote about make your website look crazy. I think, it would be much crazier this time. Same as before, just go to any website, delete everything in the address bar and copy/paste the following code in the address bar and then press enter:-

javascript:document.body.contentEditable='true'; document.designMode='on'; void 0

After that, start edit everything in that website. You can move picture to another place, change the text and of course, you can delete them. This is what I did to Digg website..hehe:-

It's just for fun anyway..:)

That's all for today!! Yeahh!

Credits: Digg

Wednesday, November 7, 2007

Sophos JEEFOGUI – Powerful tool to remove W32:Jeefo

Woww!! What else can I say about this tool!!! Sophos JEEFOGUI is the powerful tool to remove, repair and stop the troublesome W32:Jeefo virus from running in your system. Full thanks and credits to whoever behind the development of this handy software. Yea, it’s totally free to use.

If you have no idea about 
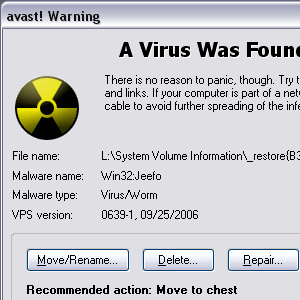
W32:Jeefo virus, I will tell you a little bit info about it. W32:Jeefo infects all of Windows PE executables with an extension of .EXE and a filesize greater than 102,399 bytes, in all folders of all fixed drives C: to Z:. Other than that, it runs continuously in the background, infecting files at periodic intervals with no mercy.

Take a look at the screenshot below (I used Avast Antivirus to scan all my drives):-

It was really annoying and pissed me off. For those who have the same experience like me and don’t know how to get rid of it might be take a painful step to format drive C: and delete manually all the .exe files. And after that, they have no choice but to reinstall all Windows, drivers, software and they have to download all their favorite games including Pac Man (maybe).

Ok, this is how I get rid of W32:Jeefo using JEEFOGUI.

Step 1

Stop the antivirus software from scanning and close it. Download JEEFOGUI.com tool (Yes, it has .com extension). Run this software and click Accept.

Note: JEEFOGUI.com will delete the file SVCHOST.EXE, disinfect all infected files and remove the registry entries.


Step 2

You will see a simple interface and without wasting any time, click on the green GO button to start scan all your drives. It will start detecting infected files and at the same time, it will repair/remove/disinfect the infected files automatically. See image below:-


Step 3

Close JEEFOGUI after it already finished scanned and disinfected the files. Ok, now we have to 
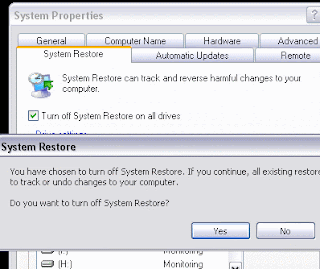
turn off the System Restore.

Note: This will delete any previously created restore points.

For Windows XP user (I’m not really sure for Win 98/ME user), simply go to your Desktop > right click on My Computer icon > Properties and select the System Restore tab (or Windows+Pause/Break and select System Restore tab). Now check the Turn off System Restore on all drives checkbox, click Apply and click Yes. See image below:-

After that uncheck that same checkbox (to turn it on), click Apply and click OK. See image below:-

Restart your computer. DONE.

Right now, you can run all your program/.exe files without any worries. Yeahh..that’s all!

Optional: You can use Sophos Anti-Virus to protect your computer against the latest viruses.

Download Sophos Antivirus.

Note:

1. The other tool, JEEFOCLI is designed to be run from the command prompt and can be called from batch files or other scripts. This tool is designed for use on large networks.

2. Sophos's anti-virus solutions can remove and disinfect infections including Brontok virus and other viruses.

Credits: LinkMania

Friday, November 2, 2007

Wednesday, October 31, 2007

Windows XP - Remove the Scheduled Tasks & Printers and Faxes folders

Ok, it's time for Win XP tips. When you browse your computer on the network/workgroup share folder window, you will notice these 2 folders will appear automatically; Scheduled Tasks & Printers and Faxes folders (see image above). Maybe you'd like to see your computer share folder window looks clean or empty. There is no way you can right click on it and then delete the folder icon. This is how you can delete those folders or easy to say...get rid of them.

Simply follow these steps:-

Step 1

Open your Registry window. Go to Run (Windows+R) type regedit and press ENTER.


Step 2

Navigate to the following key:-

HKEY_LOCAL_MACHINE\SOFTWARE\Microsoft\Windows\CurrentVersion\
Explorer\RemoteComputer \NameSpace


and you will see something like below:-

You will see some key values. Ok, now for the important part.

To remove the Scheduled Tasks folder, delete the following key:

{D6277990-4C6A-11CF-8D87-00AA0060F5BF}

and to remove the Printers and Faxes folder, delete the following key:

{2227A280-3AEA-1069-A2DE-08002B30309D}

Close your Registry window. DONE.

Go to your computer network window and those folders should be gone right now.

By the way, you still can see them on Control Panel. Go to Run (Windows+R) type control.exe and press ENTER.

If you want to recreate those folders on you computer share folder window, go to the Registry window again and navigate to the same key as above:-

HKEY_LOCAL_MACHINE\SOFTWARE\Microsoft\Windows\CurrentVersion\
Explorer\RemoteComputer \NameSpace


Select the NameSpace folder. Go to Edit > New > Key (see image below).

If you want to recreate the Scheduled Tasks folder, copy/paste the following key:

{D6277990-4C6A-11CF-8D87-00AA0060F5BF}

and if you want to recreate the Printers and Faxes folder, copy/paste the following key:

{2227A280-3AEA-1069-A2DE-08002B30309D}

Note: You will see the New Key #1 after creating the new Key. Just replace them with above Key.

Yeahhh..that's all for today!!!

Credits: WinXPTutor

Friday, October 26, 2007

'Digg me' t-shirt (video)

Hmm..some cool stuff I got while browsing the Digg website. Check out these videos:-


For more info, you can read on working 'digg me' tshirt using the Digg button kit.

Credits: MakeZine, Ladyada

Wednesday, October 24, 2007

Delutube - View deleted Youtube video

Ok, just a simple post for today. Sometime, we will see a message on Youtube video stating "we're sorry, this video is no longer available.". Well no worry, we still can watch the deleted Youtube video via Delutube.

Just copy the video ID, the one that founded at the end of the video. For example, http://www.youtube.com/watch?v=COcczatkNP4

So, the ID here is COcczatkNP4

and paste it in the ID text box and click view video.

I've tried to view some of deleted Youtube video but it's failed. Maybe Delutube can only view some of deleted videos but not all of them :(

By the way, kindly leave a comment if you have used other method to watch deleted Youtube videos.

That all for today..

Saturday, October 20, 2007

DirectVobSub - Displaying subtitle in Real Media file

Back then, I never think about installing any subtitle tool anyway. It's because of all my downloaded movies was in .avi extension. Just open the movie file using the VLC player, and everything would be fine including the codecs and subtitle file.

Yesterday, I just downloaded the Real Media movie file with .rmvb extension including the subtitle file. As mentioned before, I never used their software (Real Player) since I found Real Alternative.

I tried to open the rmvb file but it failed to load the subtitle. Finally, I install the DirectVobSub and reopen my Real Media file. And, tadaa!! It loads the subtitle file!

I never know whether this tool is working on other file extension such as .rm, .ra or .ram. It should be. But, one thing for sure is that your subtitle files should have the same filename as your video file (for example movie.avi, movie.idx, movie.sub, movie.txt) and should be in the same folder (directory) as your video file. Then the subtitles will automatically be displayed in media players.

I think that's all for today.

Feel free to download DirectVobSub.

Note that this is a new version of DirectVobSub (VSFilter). Use the old version only if you have problems with the newer versions of DirectVobSub, which are also included in the K-Lite (Mega) Codec Pack.

Yeahh!!!

Credits: Final Builds Site

Tuesday, October 9, 2007

Blogger - Track your visitor using Site Meter

Hmm..I never know if I can call this a blogger tips. Site Meter was a pretty handy web tracking tool I've ever used. It gives you a detailed report of who is visiting your blog, how they found you, where they came from, what interests them and much more.

For past 5 months, what is exactly I can tell you is that 90% of my visitor was came from Google. A lot of them was looking for Illustrator tutorial. Well, I really never know whether my article was good enough since I've rarely received any feedback from my comment box or email.

By the way, it was really easy to use Site Meter. Just sign up for Site Meter Basic. Get the code and paste it into your HTML/JavaScript widget. As you can see, I have placed the code at the bottom of the page.

Other than that, you also can customize the meter style or even set the level of privacy for your site statistics.

I think that's all for now. It was totally free and easy to use. Just grab it!

Yihaaa!!!

Monday, October 8, 2007

Free Download Manager (FDM) - Free download accelerator

Free Download Manager (FDM) is just another download manager I used instead of IDM. FDM is totally free and it is different from IDM which you have to pay to use its full features.

Other than that, FDM has a lots of useful features and you know what, it also supports for downloading a BitTorrent files.

Take a look of these screenshot:-

As you can see, the download speed was not really bad though. For me, 100++ KB/s was really good enough to download a large file from DivX Stage6.

Another great features of FDM:-

GNU General Public License
Free Download Manager is released under GNU Public License!

BitTorrent support
Download files using BitTorrent protocol (available in Windows 2000/XP/2003/Vista).

Flash video download
Download video from video sites, such as Youtube, Google Video, etc. The video can then be saved in native .flv format or converted to one of more popular video formats.

Download acceleration
Free Download Manager splits files into several sections and downloads them simultaneously, allowing you to use any type of connection at the maximum available speed. With FDM download speed increases, or even more!

Resuming broken downloads
When the downloading process is interrupted, you needn't start from the beginning again. Free Download Manager can resume broken download from where it was interrupted saving your time, nerves and money.

Hmm..it looks great, isn't it? Why don't you try this software. I really recommended it. Multi functional, simple user interface design and really easy to use. You won't be regret. Hehe..

Ok, that's all for now. Visit FDM website for more information about FDM features.

Feel free to download FDM.

Yeahh..

Friday, October 5, 2007

How to backup the Windows XP Registry? (link)

Ok, a great tips from Ramesh on how to backup your Win XP registry.

Feel free to read the full article.

I always used Method 2 in order to backup my registry file. Just go to regedit, export and save. As simple as that.

That's all for today!!!

Thursday, October 4, 2007

Megaupload SX 4.3 - Bypass Megaupload country slot limit

Just another great extension for Firefox user. The Megaupload SX 4.3 is an extension that will bypass Megaupload country slot limit without installing their toolbar.

I've installed this extension and it work fine on my Firefox 2.0.0.7. This extension will be placed under your Tools menu bar. To activate it, just select Enabled and you're ready to download a file.


Ok, that's all for day. Feel free to install Megaupload SX 4.3.

Update:

[12/20/07]
Raymond has found a cool website, http://www.freemu.info/ to generate a free premium link for Megaupload. Enjoy!!!


Credits: Raymond.CC

Tuesday, October 2, 2007

Download videos from DivX Stage6


Hmm..DivX Stage6 website was very great. You can find a lots of cool videos, full length movies and anime right there. By the way, to download any video from that website, just click this image (located in the middle of the video player)


To download a multiple videos, I just copy the link location and paste it into my download manager.

If you don't have any idea what to download or watch, just browse the channel page. I'm pretty sure that you'll get something that will caught your attention.

Other than that, to play the downloaded videos, make sure you've already installed the DivX player. You can download it right here.

Update: You also can play the .divx file using VLC player. I've tried it and it works fine. Feel free to download VLC media player.

That's all..yeah!!

Saturday, September 29, 2007

Happy 9th birthday Google!

Yeah..I know that maybe it's too late to say this. Happy 9th birthday Google!!! Hehe...

I don't want to say anything in this post and just want to show you how was Google looked in 1998.

Check out this screenshot which I got from Wayback Machine:-

To be honest, I never use or even know about Google search engine in 1998-2000. The only search engine I used that time was Yahoo!, one of the Google's top rivals.

That's all for now! Have a nice day!

Friday, September 28, 2007

Blogger - Publish post via email

Ok, just a simple blogger.com tip for today. It is really easy to publish your post via email.

Ok, check out this simple steps:-

Step 1

Go to your Dashboard > Settings > Email. Fill in any secret keyword for your email on Mail-to-Blogger Address. For example, see below (Click to enlarge image):-

Then, click Save Settings.


Step2

Log on to your email account. I will use my Gmail account as an example. Take a look at this screenshot:-

Ok, this is the settings:-

To: Your Mail-to-Blogger Address (Step 1)

Subject: Your post title

Body/Message: Your post/article


The #end sign at the end of the post is to make sure there are no extra message will be published into your post. Normally some email programs append text to the bottom of each sent message.

Then, send your email and DONE.

Please keep your Mail-to-Blogger email address secret or otherwise, anyone who gets it will be able to post as you.

The only problem is that you cannot set a label for each post you published. Kindly drop a comment if you've found a trick to solve this problem.

Visit my dX-Demo blog to see the result.

That's all for today. Yea!!

Thursday, September 27, 2007

SpeedFan - Access temperature sensor in your PC

SpeedFan is a hardware monitoring software that is able to change fan speeds according to system temperatures. SpeedFan can read S.M.A.R.T. values (and temperatures) from your hard disks and change the FSB speed.

Hmm..This tool was very powerful. Why? Rather than normally shows your system or hardware temperature, it also can be an overclocking tool. I don't really expert on overclocking stuff, but I think that maybe you'd like to know your CPU temperature while playing a heavy PC games.

Take a look of the screenshot below:-

Image above shows the temperature of my current system right now. As you can see, it has Temp1, Temp2 and Temp3. What the hack was that? And of course, HD0 is obviously for my hard drive temperature. I make a quick search through Google and have found out an easy way to know which temperature it is belong to.

Just download this software, Everest Corporate Edition. This software will define which temperature is belong to Temp1, Temp2 and Temp3. After installing this software, go to Computer > Sensor. It should tell you your temperatures.

Ok, lets take a look at this screenshot:-

Now, compare to the image before that. Right now I'm pretty sure that:-

Temp1 = Aux
Temp2 = Motherboard
Temp3 = CPU

According to Lavalys, there is no standard for sensor registers layout, so the "Aux" temperature could show the temperature of the CPU or the motherboard, or might be a non-connected wire of the sensor chip, and so it could show a bogus value.

Ok, enough talking about that, lets see its technical details:

Title: SpeedFan 4.33
Filename: installspeedfan433.exe
File size: 1.55MB (1,629,817 bytes)
Requirements: Windows (All Versions)
License: Freeware
Date added: September 18, 2007
Author: Almico

Yea..it's absolutely free. You can download it on Almico website or SoftPedia.

Other SpeedFan features:
  • handle almost any number of South Bridges
  • handle almost any number of hardware monitor chips
  • handle almost any number of temperature readings
  • handle almost any number of voltage readings
  • handle almost any number of fan speed readings
  • handle almost any number of PWMs
I think that's all I wanna say right now. I still on my way to learn using this software to overclock my computer..hehe.

Credits: FileHippo, Overclock.net

Wednesday, September 26, 2007

Windows XP - Customize Folder Background

Ok, just a simple Win XP tip for today. If you have an experience using Windows 98 before, you will notice that there are an option or wizard to customize and change the folder background image. Unfortunately, this cool feature does not exist in Windows XP. No worry, in this short article, I will show you how easy it is to customize your folder background in XP.

Step 1

First thing first, download this utility tool, IESHWIZ


Step 2

After that, extract IESHWIZ.zip to C:\Windows\System32 folder. This zip file will extract the ieshwiz.exe file into System32 folder.


Step 3

Next, open a command prompt (Windows+R and then type cmd, press ENTER), and type:-

IESHWIZ <path:\foldername>

E.g:- To customize the "test" folder in drive D:, type IESHWIZ D:\test and press ENTER.

Note: In this tip, I will using the "test" folder in my local drive D:


Step 4

You will see a popup window and something like below:-

Select the Choose a background picture. Click Next.


Step 5

I will make some settings like below:-

I used my dX-Vista Maniac as a background image..hehe..Click Browse and you can select either a .bmp, .jpeg or .gif image. Click Next and Finish.

Done. Now go to the "test" folder in D: and you can see if the changes are applied.

All of the these settings are stored in a file named Desktop.ini within that folder. You can read more about Desktop.ini on MSDN website.

Note: If you want to remove all the settings that you've made before, simply follow the step above from Step 1 to 4. But in Step 4, please select the Remove Customization. Click Next and Finish.

*Another alternative that I've just found out was, you can extract the IESHWIZ.zip file in the folder which you want to make a changes. Just run the ieshwiz.exe file and start the customization. E.g:- Extract the IESHWIZ.zip into our "test" folder.

That's all for today! Yeahh!!

Credits: Ramesh's site

Tuesday, September 25, 2007

MediaFire - The simplest free file hosting service

Yea..it's true. MediaFire is the simplest free file hosting service I've ever used. It is totally different from Rapidshare, YouSendIt or Megaupload. The most important feature is, there are no time limit for your uploaded files to be stored. Means that, your files will never be deleted and if so, they will notify you via email.

Ok, let's check out the another great features of MediaFire:-

1. 100% Free - Yea..you don't have to pay for using this service.

2. Unlimited Disk Space - Upload as many files as you want!

3. Up to 100MB per File - Make the uploading process more faster

4. No Sign Up Required - You don't need to register to use their service and still, you can share the files with your friends. But, it is recommended to create your own account so that easy for you to manage your files.

By the way, after having uploaded 1 file, I've tried to register and guess what, it just took me less than 10 seconds to create a new account. Really awesome!

Beside that, you can read their blog to get any updates.

That's all for today! Yeahh!!

Friday, September 21, 2007

Firefox: The secrets of about:config (link)

Hmm..I just want to drop a link right here. There are a lot of useful Firefox tricks worth to know in this article. I've tried some of them and it was really cool.

Feel free to read these long article:-
To be honest, I'm quite lazy to read the whole article right now..hehe. If you've found out some interesting stuffs, feel free to share with me. Maybe next time I'll publish on my blog about some cool tricks that I got from that article.

That's all for today! Happy hacking!

Thursday, September 20, 2007

Cool Gmail video

Haha..this video was really cool. It's about how an email message could be travels around the world. This Gmail video was a combination of a videos that was submitted by Gmail fans. And Google has put them together.

Check out this video:-


Yea...it's really great. More Gmail videos on Youtube.

That's all for today and have fun!

Monday, September 17, 2007

Blogger - Add recent comments (link)

I just found this cool blogger tips and maybe be next time I'd like to install this widget into my blog. It's a recent comments widget.

For New Blogger

Check out this recent comments widget.


For Classic Blogger

How to add recent comments in the sidebar?

Yeahh!!!

Updates: I've added how to add recent comments link for Classic Blogger.

Friday, September 14, 2007

elgooG - Display Google results in backwards

Well, I never know why do I need to publish this article. It's just for killing some time anyway. elgooG is a site where you can find Google's homepage in the mirror. You have to type your search terms in reverse and of course, your search results will be displayed backwards.

Check out this image when I tried to search my own blog name, leX-Xd:-

It's awesome isn't it? Please note that the default button is "I'm Feeling Lucky". So, if you want to do a web searching, you have to click the "Google Search" button rather than pressing the ENTER key.

According to All Too Flat, they are just doing this for fun. Yeahh...it's only for fun.

I think that's all for today. Have fun!!

For further information please visit the Google Mirror FAQ.

See also another search results for ggiD, ebutuoY, xoferiF and tfosorciM.

Credits: Google OS

Thursday, September 13, 2007

Windows XP - Close or stop unwanted services

If you are a single user of a non-networked machine, this tips might be useful for you. By disabling the unneeded services, your Windows XP should be running faster than before. Yea..it will increase your system performance. What I'm talking about is everything on your Windows XP Services.

To open up your Windows Services, simply go to Windows Run (Windows + R) type services.msc and press ENTER. You should have something like below:-

Ok, now for the interesting part. No worries, there are no ill effects or something that will crash your system when you disabling the following items. To stop the service, right click on the selected item > Stop.

Check out these lists:-
  • Alerter
  • Clipbook
  • Computer Browser
  • Fast User Switching
  • Human Interface Access Devices
  • Indexing Service (Slows the hard drive down)
  • Messenger
  • Net Logon (unnecessary unless networked on a Domain)
  • Netmeeting Remote Desktop Sharing (disabled for extra security)
  • Remote Desktop Help Session Manager (disabled for extra security)
  • Remote Procedure Call Locator
  • Remote Registry (disabled for extra security)
  • Routing & Remote Access (disabled for extra security)
  • Server
  • SSDP Discovery Service (this is for the utterly pointless "Universal P'n'P", & leaves TCP Port 5000 wide open)
  • TCP/IP NetBIOS Helper
  • Telnet (disabled for extra security)
  • Universal Plug and Play Device Host
  • Upload Manager
  • Windows Time
  • Wireless Zero Configuration (for wireless networks)
  • Workstation
Yeahh..what do you think about that? I really hope this information was useful for you guys (for me too). If you have encountered any problem, feel free to reset your Windows Service to default setting. Well then, that's all for today!!

Further reading: Turn Off Unnecessary Windows XP Services by Jasonn

Credits: FreePCTech

Wednesday, September 12, 2007

Blogger - Add favicon image

Ok..a quick blogger tips for today. It was really easy to apply a favicon image to your blog. Don't ask me what the heck is favicon. It was a small .ico image that displayed on your browser address bar and also on your tab bar. The standard size(dimension) for favicon image are 16 x 16 and 32 x 32.

Ok, follow these simple steps:-

Step 1

Create or design your own favicon image using Adobe Photoshop or any other photo editing software. You can use your own photo instead. Save that file as .gif, .jpg or .bmp.

Note: I was designed my own favicon image (image above) in 100 x 100 resolution.


Step 2

Convert your image into .ico extension. Simply go to either these 2 websites:-

Step 3

Ok, by now you should have your own favicon image with .ico extension. Name it as myfavico.ico or anything.ico. Upload your favicon file into a free image hosting service such as ImageShack.us. Or you can just simply upload your favicon image into Google Pages. Get the URL of your favicon image. (e.g: http://mygpages.googlepages.com/myfavico.ico)


Step 4

Go to your Blogger Template > Edit HTML. Copy these code and paste it between the <head> </head> tag

<link href='http://mygpages.googlepages.com/myfavico.ico' rel='shortcut icon'/>

Note: Please change the http://mygpages.googlepages.com/myfavico.ico based on your own URL in Step 3.


Step 5

Save your template and done. Refresh your browser (F5). By now, your favicon should be appear at the address bar.

Ok, that's all for today. Yeahhh!!!

Tuesday, September 11, 2007

Gspace - Turns your Gmail account into free online storage

Yeahh...the title says it all. Gspace is another great Firefox extension. This extension allows you to use your Gmail space for file storage. It acts as an online drive, so you can upload files from your hard drive and access them from every Internet capable system.

I have installed this extension and try to upload some image and it was really cool. It has a simple user friendly interface, make it easy to use. I highly recommend you to create a new Gmail account if you really want to use this extension. Yea..you can mix the uploaded files with other email messages, but it is much more better if you have a specific account for it.

The best thing about this extension is, you can manage a multiple Gmail account in the same interface and its more looks like..hmm..lets see..a "multiple mini online hard disk". Maybe you'd like to create a new account and just use it for your college/assignment stuff and other is for your personal stuff. And of course, you can download that file anytime, anywhere.

Other than that, I also recommend you to use the portable Firefox. It will store any installed extensions in Firefox with you wherever you go. Pretty handy.

I still never know the maximum file size that can be uploaded. As far as I know, Gmail can handle an upload file up to 20MB per message. Please tell me if you have any experience of using this extension.

Usage:
  • Do not upload/download many files in a single day. You may get your account blocked for 24 houres. It seems this happens if more that 1GB of data is transferred in a single day.
  • The best thing is to upload files and folders that are NOT critical. Anyway, since file is available as an attachment on an e-mail, they will always be available through the Gmail interface, and they should be as safe as your e-mails.
Feel free to install the Gspace.

That's all for today!!!
 
Powered by Blogger