In this tutorial, I’ll show you how to create a wave text effect using a warp effect in Illustrator. It’s just a simple tutorial anyway and maybe it’ll be useful for some of you guys out there. Ok, here we go!
Software:
Adobe Illustrator CS
Step 1
Create New Document with
500px x 500px Artboard Setup. Select
RGB color for Color Mode. Press
OK.
Step 2
Click the
Type Tool or press
T and type anything on the artboard. Press
Ctrl+T to open the Character palette. Select all text and set to
Verdana,
Bold and
72pt for size.

You may close the Character palette.
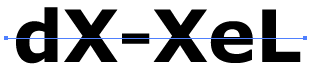
Step 3
Click the
Selection Tool (black cursor) and select the text. Go to
Object > Expand…Just press
OK if you see an Expand window. You’ll get something like below:-
 Step 4
Click the
Line Segment Tool (
\), press
Shift key and draw a horizontal line (color doesn’t matter) like below:-
Press
V, and then select both text and the line. Go to
Pathfinder palette (Shift+F9) and click the
Divide tool.
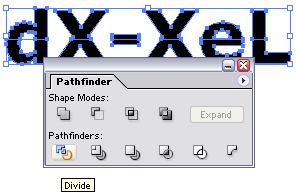
We have successfully divided the text into two parts.
Step 5
Click the
Direct Selection Tool (
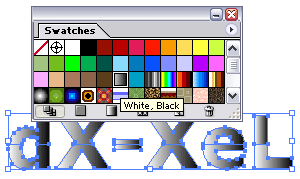
A) and select the top part of the text. Give a red color on it using
Swatches palette (Window > Swatches).
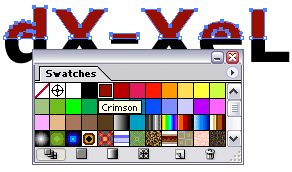
Then, select the bottom part and apply an orange color on it.
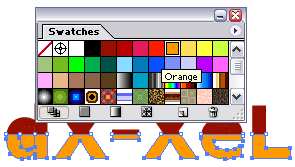
Look closely at our ‘d’ and ‘e’. Using the
Direct Selection Tool, select a filled color inside it and press
Delete. You’ll get something like below:-
 Step 6
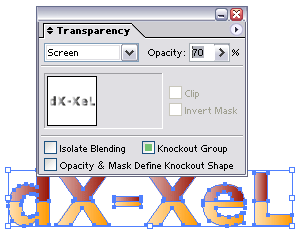
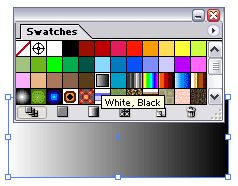
Press
V to select the text. Press
Ctrl+C to copy and then
Ctrl+F to paste it in front. Just right after that, go to your
Swatches palette and apply the
white, black gradient on it. See below:-
Then, go to your
Transparency palette (Shift+F10), set to
Screen and Opacity:
70. Press
Enter.
 Step 7
Using your
arrow keys on keyboard, move the transparent text to the
right 2 times and to the
bottom 2 times. Press
V and
select both texts, go to
Effect > Stylize > Drop Shadow…Leave everything as default and press
OK.
You should have something similar like below:-
 Step 8
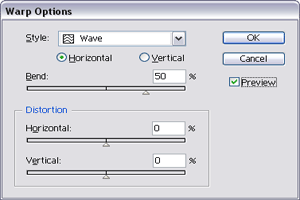
While the both texts on selected, go to
Effect > Warp > Wave... Set to
Horizontal, Bend:
50, Distortion Horizontal:
0 and Vertical:
0. Press
OK.
 Step 9
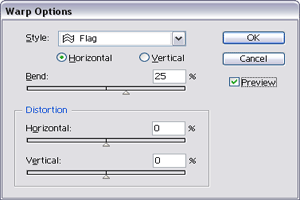
After that, go to
Effect > Warp > Flag… (Just click Apply new effect if you see some popup message). Set to
Horizontal, Bend:
25, Distortion Horizontal:
0 and Vertical:
0. Press
OK.
You’ll get something like this:-

Wow, it looks great. Well, it’s done for the wave text. Next, we gonna add some wave background image behind the text.
Step 10
Just go to any blank space on your artboard. Use the
Hand Tool or press
H to move the artboard to the left-right and top-bottom.
Select a
Rectangle Tool or press
M and click once on the artboard. Enter Width:
220px Height:
80px. Click
OK.
Just right after that, go to your
Swatches palette once again and
apply white, black gradient on it.
 Step 11
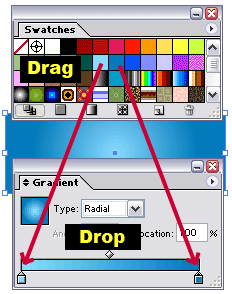
While the
Swatches palette is still on the artboard and the
rectangle is on selected, go to
Gradient palette (F9).
Drag the
light blue color from
Swatches palette and
drop it to the
left slider of the Gradient palette. And
drag the
dark blue color from Swatches palette and
drop it to the
right slider of the Gradient palette.
Set Gradient Type:
Radial
 Step 12
Just right after that go to
Effect > Stylize > Drop Shadow…Press
OK.
Ok, now, go to
Effect > Distort & Transform > Zig Zag…Enter these value. Size:
10,
Relative, Ridges per segment:
4, Point:
Smooth. Press
OK.
You should have something similar like this:-
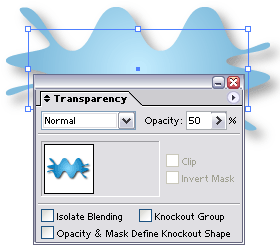
Go to
Transparency palette (Shift+F10) and set Opacity:
50
 Step 13
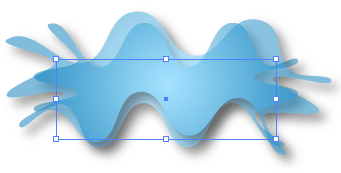
Click the
Selection Tool (V) and after that
press Alt on your keyboard.
Click on our new shape and
drag it to the bottom to make a copy.
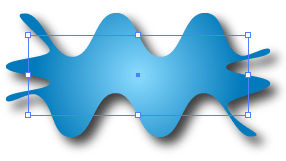
Then, go to
Effect > Warp > Arc... Set to
Horizontal, Bend:
25, Distortion Horizontal:
0 and Vertical:
0. Press
OK.
You should have something similar like this:-
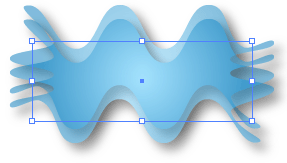
 Step 14
Select both wave shapes,
right click > Arrange > Send to Back or just press
Ctrl+Shift+[. Move them behind our wave text and
DONE.
Our final result:-

Hmm…that’s all for today and hope you enjoy this tutorial. Yeahhh!!!
 Ok, this tip is useful whenever you’d like to delete the existing URLs in the run command instead of the cached lists inside it. The URLs was listed automatically once you surf the Internet.


