Pages

Blog post updated : no update

Saturday, September 29, 2007

Happy 9th birthday Google!

Yeah..I know that maybe it's too late to say this. Happy 9th birthday Google!!! Hehe...

I don't want to say anything in this post and just want to show you how was Google looked in 1998.

Check out this screenshot which I got from Wayback Machine:-

To be honest, I never use or even know about Google search engine in 1998-2000. The only search engine I used that time was Yahoo!, one of the Google's top rivals.

That's all for now! Have a nice day!

Friday, September 28, 2007

Blogger - Publish post via email

Ok, just a simple blogger.com tip for today. It is really easy to publish your post via email.

Ok, check out this simple steps:-

Step 1

Go to your Dashboard > Settings > Email. Fill in any secret keyword for your email on Mail-to-Blogger Address. For example, see below (Click to enlarge image):-

Then, click Save Settings.


Step2

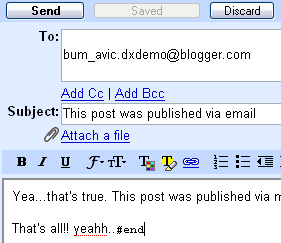
Log on to your email account. I will use my Gmail account as an example. Take a look at this screenshot:-

Ok, this is the settings:-

To: Your Mail-to-Blogger Address (Step 1)

Subject: Your post title

Body/Message: Your post/article


The #end sign at the end of the post is to make sure there are no extra message will be published into your post. Normally some email programs append text to the bottom of each sent message.

Then, send your email and DONE.

Please keep your Mail-to-Blogger email address secret or otherwise, anyone who gets it will be able to post as you.

The only problem is that you cannot set a label for each post you published. Kindly drop a comment if you've found a trick to solve this problem.

Visit my dX-Demo blog to see the result.

That's all for today. Yea!!

Thursday, September 27, 2007

SpeedFan - Access temperature sensor in your PC

SpeedFan is a hardware monitoring software that is able to change fan speeds according to system temperatures. SpeedFan can read S.M.A.R.T. values (and temperatures) from your hard disks and change the FSB speed.

Hmm..This tool was very powerful. Why? Rather than normally shows your system or hardware temperature, it also can be an overclocking tool. I don't really expert on overclocking stuff, but I think that maybe you'd like to know your CPU temperature while playing a heavy PC games.

Take a look of the screenshot below:-
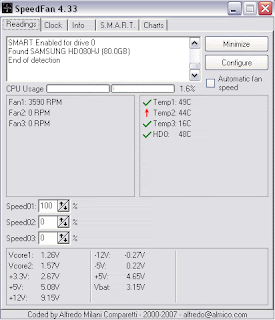
Image above shows the temperature of my current system right now. As you can see, it has Temp1, Temp2 and Temp3. What the hack was that? And of course, HD0 is obviously for my hard drive temperature. I make a quick search through Google and have found out an easy way to know which temperature it is belong to.

Just download this software, Everest Corporate Edition. This software will define which temperature is belong to Temp1, Temp2 and Temp3. After installing this software, go to Computer > Sensor. It should tell you your temperatures.

Ok, lets take a look at this screenshot:-
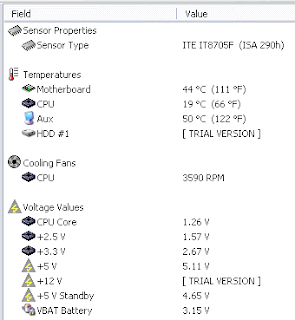
Now, compare to the image before that. Right now I'm pretty sure that:-

Temp1 = Aux
Temp2 = Motherboard
Temp3 = CPU

According to Lavalys, there is no standard for sensor registers layout, so the "Aux" temperature could show the temperature of the CPU or the motherboard, or might be a non-connected wire of the sensor chip, and so it could show a bogus value.

Ok, enough talking about that, lets see its technical details:

Title: SpeedFan 4.33
Filename: installspeedfan433.exe
File size: 1.55MB (1,629,817 bytes)
Requirements: Windows (All Versions)
License: Freeware
Date added: September 18, 2007
Author: Almico

Yea..it's absolutely free. You can download it on Almico website or SoftPedia.

Other SpeedFan features:
  • handle almost any number of South Bridges
  • handle almost any number of hardware monitor chips
  • handle almost any number of temperature readings
  • handle almost any number of voltage readings
  • handle almost any number of fan speed readings
  • handle almost any number of PWMs
I think that's all I wanna say right now. I still on my way to learn using this software to overclock my computer..hehe.

Credits: FileHippo, Overclock.net

Wednesday, September 26, 2007

Windows XP - Customize Folder Background

Ok, just a simple Win XP tip for today. If you have an experience using Windows 98 before, you will notice that there are an option or wizard to customize and change the folder background image. Unfortunately, this cool feature does not exist in Windows XP. No worry, in this short article, I will show you how easy it is to customize your folder background in XP.

Step 1

First thing first, download this utility tool, IESHWIZ


Step 2

After that, extract IESHWIZ.zip to C:\Windows\System32 folder. This zip file will extract the ieshwiz.exe file into System32 folder.


Step 3

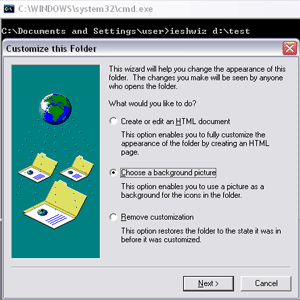
Next, open a command prompt (Windows+R and then type cmd, press ENTER), and type:-

IESHWIZ <path:\foldername>

E.g:- To customize the "test" folder in drive D:, type IESHWIZ D:\test and press ENTER.

Note: In this tip, I will using the "test" folder in my local drive D:


Step 4

You will see a popup window and something like below:-

Select the Choose a background picture. Click Next.


Step 5

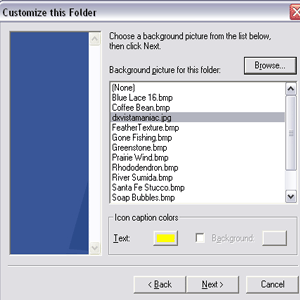
I will make some settings like below:-

I used my dX-Vista Maniac as a background image..hehe..Click Browse and you can select either a .bmp, .jpeg or .gif image. Click Next and Finish.

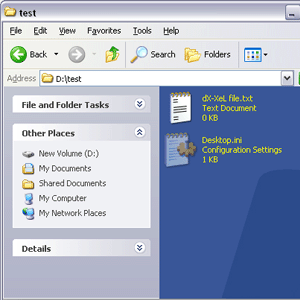
Done. Now go to the "test" folder in D: and you can see if the changes are applied.

All of the these settings are stored in a file named Desktop.ini within that folder. You can read more about Desktop.ini on MSDN website.

Note: If you want to remove all the settings that you've made before, simply follow the step above from Step 1 to 4. But in Step 4, please select the Remove Customization. Click Next and Finish.

*Another alternative that I've just found out was, you can extract the IESHWIZ.zip file in the folder which you want to make a changes. Just run the ieshwiz.exe file and start the customization. E.g:- Extract the IESHWIZ.zip into our "test" folder.

That's all for today! Yeahh!!

Credits: Ramesh's site

Tuesday, September 25, 2007

MediaFire - The simplest free file hosting service

Yea..it's true. MediaFire is the simplest free file hosting service I've ever used. It is totally different from Rapidshare, YouSendIt or Megaupload. The most important feature is, there are no time limit for your uploaded files to be stored. Means that, your files will never be deleted and if so, they will notify you via email.

Ok, let's check out the another great features of MediaFire:-

1. 100% Free - Yea..you don't have to pay for using this service.

2. Unlimited Disk Space - Upload as many files as you want!

3. Up to 100MB per File - Make the uploading process more faster

4. No Sign Up Required - You don't need to register to use their service and still, you can share the files with your friends. But, it is recommended to create your own account so that easy for you to manage your files.

By the way, after having uploaded 1 file, I've tried to register and guess what, it just took me less than 10 seconds to create a new account. Really awesome!

Beside that, you can read their blog to get any updates.

That's all for today! Yeahh!!

Friday, September 21, 2007

Firefox: The secrets of about:config (link)

Hmm..I just want to drop a link right here. There are a lot of useful Firefox tricks worth to know in this article. I've tried some of them and it was really cool.

Feel free to read these long article:-
To be honest, I'm quite lazy to read the whole article right now..hehe. If you've found out some interesting stuffs, feel free to share with me. Maybe next time I'll publish on my blog about some cool tricks that I got from that article.

That's all for today! Happy hacking!

Thursday, September 20, 2007

Cool Gmail video

Haha..this video was really cool. It's about how an email message could be travels around the world. This Gmail video was a combination of a videos that was submitted by Gmail fans. And Google has put them together.

Check out this video:-


Yea...it's really great. More Gmail videos on Youtube.

That's all for today and have fun!

Monday, September 17, 2007

Blogger - Add recent comments (link)

I just found this cool blogger tips and maybe be next time I'd like to install this widget into my blog. It's a recent comments widget.

For New Blogger

Check out this recent comments widget.


For Classic Blogger

How to add recent comments in the sidebar?

Yeahh!!!

Updates: I've added how to add recent comments link for Classic Blogger.

Friday, September 14, 2007

elgooG - Display Google results in backwards

Well, I never know why do I need to publish this article. It's just for killing some time anyway. elgooG is a site where you can find Google's homepage in the mirror. You have to type your search terms in reverse and of course, your search results will be displayed backwards.

Check out this image when I tried to search my own blog name, leX-Xd:-

It's awesome isn't it? Please note that the default button is "I'm Feeling Lucky". So, if you want to do a web searching, you have to click the "Google Search" button rather than pressing the ENTER key.

According to All Too Flat, they are just doing this for fun. Yeahh...it's only for fun.

I think that's all for today. Have fun!!

For further information please visit the Google Mirror FAQ.

See also another search results for ggiD, ebutuoY, xoferiF and tfosorciM.

Credits: Google OS

Thursday, September 13, 2007

Windows XP - Close or stop unwanted services

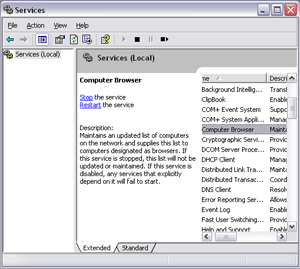
If you are a single user of a non-networked machine, this tips might be useful for you. By disabling the unneeded services, your Windows XP should be running faster than before. Yea..it will increase your system performance. What I'm talking about is everything on your Windows XP Services.

To open up your Windows Services, simply go to Windows Run (Windows + R) type services.msc and press ENTER. You should have something like below:-

Ok, now for the interesting part. No worries, there are no ill effects or something that will crash your system when you disabling the following items. To stop the service, right click on the selected item > Stop.

Check out these lists:-
  • Alerter
  • Clipbook
  • Computer Browser
  • Fast User Switching
  • Human Interface Access Devices
  • Indexing Service (Slows the hard drive down)
  • Messenger
  • Net Logon (unnecessary unless networked on a Domain)
  • Netmeeting Remote Desktop Sharing (disabled for extra security)
  • Remote Desktop Help Session Manager (disabled for extra security)
  • Remote Procedure Call Locator
  • Remote Registry (disabled for extra security)
  • Routing & Remote Access (disabled for extra security)
  • Server
  • SSDP Discovery Service (this is for the utterly pointless "Universal P'n'P", & leaves TCP Port 5000 wide open)
  • TCP/IP NetBIOS Helper
  • Telnet (disabled for extra security)
  • Universal Plug and Play Device Host
  • Upload Manager
  • Windows Time
  • Wireless Zero Configuration (for wireless networks)
  • Workstation
Yeahh..what do you think about that? I really hope this information was useful for you guys (for me too). If you have encountered any problem, feel free to reset your Windows Service to default setting. Well then, that's all for today!!

Further reading: Turn Off Unnecessary Windows XP Services by Jasonn

Credits: FreePCTech

Wednesday, September 12, 2007

Blogger - Add favicon image

Ok..a quick blogger tips for today. It was really easy to apply a favicon image to your blog. Don't ask me what the heck is favicon. It was a small .ico image that displayed on your browser address bar and also on your tab bar. The standard size(dimension) for favicon image are 16 x 16 and 32 x 32.

Ok, follow these simple steps:-

Step 1

Create or design your own favicon image using Adobe Photoshop or any other photo editing software. You can use your own photo instead. Save that file as .gif, .jpg or .bmp.

Note: I was designed my own favicon image (image above) in 100 x 100 resolution.


Step 2

Convert your image into .ico extension. Simply go to either these 2 websites:-

Step 3

Ok, by now you should have your own favicon image with .ico extension. Name it as myfavico.ico or anything.ico. Upload your favicon file into a free image hosting service such as ImageShack.us. Or you can just simply upload your favicon image into Google Pages. Get the URL of your favicon image. (e.g: http://mygpages.googlepages.com/myfavico.ico)


Step 4

Go to your Blogger Template > Edit HTML. Copy these code and paste it between the <head> </head> tag

<link href='http://mygpages.googlepages.com/myfavico.ico' rel='shortcut icon'/>

Note: Please change the http://mygpages.googlepages.com/myfavico.ico based on your own URL in Step 3.


Step 5

Save your template and done. Refresh your browser (F5). By now, your favicon should be appear at the address bar.

Ok, that's all for today. Yeahhh!!!

Tuesday, September 11, 2007

Gspace - Turns your Gmail account into free online storage

Yeahh...the title says it all. Gspace is another great Firefox extension. This extension allows you to use your Gmail space for file storage. It acts as an online drive, so you can upload files from your hard drive and access them from every Internet capable system.

I have installed this extension and try to upload some image and it was really cool. It has a simple user friendly interface, make it easy to use. I highly recommend you to create a new Gmail account if you really want to use this extension. Yea..you can mix the uploaded files with other email messages, but it is much more better if you have a specific account for it.

The best thing about this extension is, you can manage a multiple Gmail account in the same interface and its more looks like..hmm..lets see..a "multiple mini online hard disk". Maybe you'd like to create a new account and just use it for your college/assignment stuff and other is for your personal stuff. And of course, you can download that file anytime, anywhere.

Other than that, I also recommend you to use the portable Firefox. It will store any installed extensions in Firefox with you wherever you go. Pretty handy.

I still never know the maximum file size that can be uploaded. As far as I know, Gmail can handle an upload file up to 20MB per message. Please tell me if you have any experience of using this extension.

Usage:
  • Do not upload/download many files in a single day. You may get your account blocked for 24 houres. It seems this happens if more that 1GB of data is transferred in a single day.
  • The best thing is to upload files and folders that are NOT critical. Anyway, since file is available as an attachment on an e-mail, they will always be available through the Gmail interface, and they should be as safe as your e-mails.
Feel free to install the Gspace.

That's all for today!!!

Saturday, September 8, 2007

Download dX-2XP (Wallpaper)

[ Download | 1024x768 ]

It's just a simple Win XP wallpaper anyway. I've applied the 3D and the gradient effect to create this wallpaper. Feel free to download if you like it.

Everything was designed and created using Adobe Illustrator.

Check out the details:-

Name: dX-2XP
Type: Wallpaper
Dimensions: 1024 x 768
Theme: Windows XP
File size: 134 KB
Date created: Sept 08, 07
Software: Adobe Illustrator
Color: Black, White
Background Color:
  • HEX: #000000
  • RGB: 0, 0, 0

Extract the file using WinRAR.

That's all for today!!

Friday, September 7, 2007

Illustrator Tutorial - Pen tool tips (video & links)

Hmm..a lot of you guys has come to my blog when you are searching on Illustrator Pen Tool tips via Google. Yea..of course you'll landing on my Illustrator pen tool's tutorial page, but somehow, I think that the guideline on that tutorial was not enough.

I have googling somewhere and have found 2 links for you to practice the Pen Tool. It is a very basic tutorial and very useful for a beginner (like me..hehe). Ok, check out these tutorials:-

1. Basic Drawing with Adobe Illustrator's Paths & Pen tool by Kevin Hulsey

In this tutorial, he will teach you a basic lesson in the use of the Illustrator Pen tool and it's ability to create shapes and curves. Other than that, he will tell you a basic usage of every elements in Pen Tool including the "Plus" pen tool, "Minus" pen tool, stroke, fill and so on. At the end of this tutorial, you should know on how to draw a Bézier curve.


2. Illustrator: The Pen Tool by Toni Toland (video)

This tutorial is the most recommended Illustrator pen tool tutorial from me. You will learn every single function on a Pen Tool on just a few minutes. Yea..just a minutes. He will teach you on how to draw a curve, corner, corner + curve and reverse curve.

Beside that, you will know on how to add, delete and convert the anchor points in the image that you have just created. By the end of this tutorial, you should be able to understand each function in the Pen Tool and draw a perfect curve.

However, you need a high speed internet connection to view this page. All the videos was totally embedded into that page and really take a lot times to load.

Updates:

[01/19/08]
I just found this great Illustrator pen tool tutorial video from Youtube. Let's practice!


I think that's all for now. Remember, practice make perfect. The Illustrator Pen Tool knowledge and skills will become very important when you want to trace some photo. Maybe next time I will discuss about it.

Yeahh!!

Thursday, September 6, 2007

Spybot Search & Destroy - Free antispyware tool

Spybot Search & Destroy (S&D) is a great antispyware program. Why? Of course, it's totally free but it's not only about that. Spybot S&D is a wonderful tool to find and get rid of the spyware, adware and other dangerous stuffs in your system. This software was developed by PepiMK Software.

Let's see its technical details:-

Title: Spybot Search and Destroy
Latest Version: 1.5.1
Filename: spybotsd15.exe
File size: 7.12MB (7,467,056 bytes)
Requirements: Windows (All Versions)
License: Freeware
Latest Updated: September 4, 2007
Author: PepiMK Software

As you can see, it's just updated a few days ago. The other great thing about this software is, it can run a system scans effectively and faster. Besides, Spybot S&D implements powerful real-time protection that blocks malicious ActiveX scripts and keeps unsolicited software off the system. With a simple and user-friendly interface, I think, it was really handy and easy to use this software.

Hmm..I think that's all I wanna say this time. Just download, install and use it. It's really a recommended software from me. Feel free to download Spybot S&D.

If you are still new or not very familiar with this software, just follow the tutorial on how to install and use the Spybot S&D on 2-Spyware.com website.

Other than that, maybe you'd like to see a comparison between the Spybot S&D and other antispyware programs.

See also a review at Download.com website.

That's all for today!

Credits: FileHippo

Wednesday, September 5, 2007

ExtremeTech Case Mod Contest 2007

Alright..this is great. The ExtremeTech Case Mode Contest 2007. By the way, the contest has already ended and the winner was already decided. The contest was started from July 16 and has been end on August 12, 2007.

I don't want to talk too much about this contest. I just want to share some of the coolest pictures from that website.

Check out these links:-
It was really cool, isn't it? Maybe someday I'd like to mod my own cpu case. Hehe.. It's was a great things to do. Ok, that's all for today!

See also the winner for week one, week two and the other contestants.

Updates: I've removed all images in this post. ExtremeTech does not allow to reproduce and display their copyrighted content.

Credits: Digg, ExtremeTech

Monday, September 3, 2007

Google Hacks - Hacks or cracks?

Maybe some of you already know about this software. Ok, I copy/paste it directly from their website. Take a look of this release note:-

"Google Hacks is a compilation of carefully crafted Google searches that expose novel functionality from Google's search and map services. For example, you can use it to view a timeline of your search results, view a map, search for music, search for books, and perform many other specific kinds of searches. You can also use this program to use google as a proxy."

Hmm..in my opinion, the purpose of developing this software is to protect your web server from the attackers that use search engines as a hacking tool against your resources or data.

Well, I have nothing to worry right now because I don't have my own website/server. I don't know about you guys out there. I've installed this software (image above) and try to search some file, and the results was awesome. Awesome? Yeahh..because a lot of webmasters out there didn't protect their files on their server. I can easily access the root folder (index of / "parent directory") and download some "interesting stuffs". Hehe.. Besides, some of them was just shared their folder on purpose.

By the way, I've a few tips to share in order to protect you root file or folder. It's just a common way to protect your server. The .htaccess file.

I've googling somewhere and found this tutorials. It might be useful for you to protect your web directories.

Check out these websites:-
Another alternative that you can use is by using The "Google Hack" Honeypot.

I think that's all for today. Feel free to download the Google Hacks.

Note: Please do not use this program for illegal uses.

Update: Other similar services are Google to person and Googaal.

Credits: Raymond.CC
 
Powered by Blogger