
Well, I don't even know if I can call this an Illustrator tutorial. It's the basic thing you should learn. For Illustrator's experts, the pen tool is the very important tool to make the tracing or drawing result to look nicely and smoothly on the artboard. For me, it's not impossible (I mean, you can do it too).
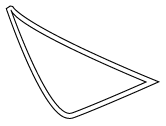
In this tutorial, we will learn on how to draw the Spider-man's eyes (See image above).
Software: Adobe Illustrator CS
Step 1
Create a new file with any Artboard Setup and make sure you select the RGB Color for Color Mode. I used 600px x 600px artboard setting in this tutorial.
Step 2
Select the Pen Tool (P)
 and make sure your fill color look like this
  . Make the first Anchor Point
  in your artboard. After that, make another Anchor Point at the top left from the first one. Stay at that point and don't release your left click. Drag your mouse cursor to the top a little bit to make a curve and release your left click. It would be something like this:-
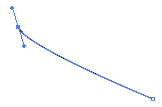
Now, this is the important step. While the pen tool is still selected, click on the anchor point that we’ve just created to get rid one of the anchor point’s handler.
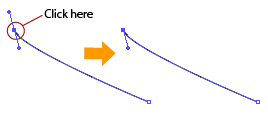
Why do I say that this is an important step?
Well, I don’t know how to say but if you did this every time after you’ve added a new anchor point, you’ll be able to control on how the curve will be drawing after that.
If you try to trace some photo using Illustrator, then, this is the step that you should know or you’ll be end up with an ugly shape.
Step 3
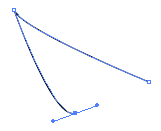
Make the third anchor point on the bottom-center of the line created before. Hold your left click and drag your mouse cursor to the first Anchor Point a little bit until you satisfied with the shape (see below).
Step 4
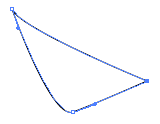
Complete the shape with clicking to the first Anchor Point (see below).
Note:-
1. At this point, I expect that you’ve know on how the pen tool works. We have to click at our very first anchor point to complete the shape except if you only want to draw a curve line.
2. The curve shape will be appear when you start dragging your second anchor point to the left-right or top-bottom.
3. By pressing the Shift key while you’re dragging the anchor point, you’ll able to draw the curve in 45 degrees, 90 degrees and so on.
Step 5
Select the shape that you have just created and go to Object > Path > Set Path. Enter this value, Offset: 5px, Joins: Miter, Miter Limit: 4. Press OK (see below).
Step 6
To make the shape angle look nicely, select the Direct Selection Tool (A)
 , after that select the offset path and then select the Add Anchor Point Tool (+)
  . Add Anchor Point to the angle and move it up-down or left-right using the arrow key at your keyboard (see below).
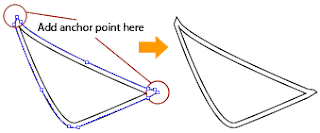
Step 7
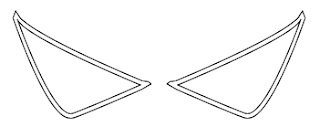
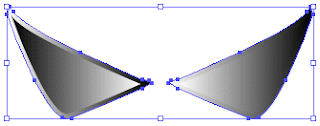
Select the whole image, copy (Ctrl + C) and paste it in front (Ctrl + F). And then right click > Transform > Reflect and select Axis: Vertical, Angle: 90. Move the duplicate image to the right and congratulation, you’ve draw the Spider-man’s eyes!
And this is the Spider-man's eyes!
Ok, go to next step to give this eye some color.
Step 8
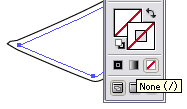
Select the eye on the right side and remove the outline stroke by clicking the None tool or press the / on your keyboard. See below:-
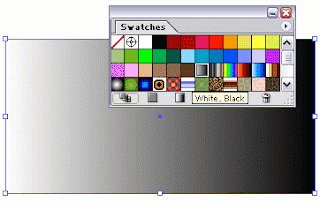
Just right after that, apply the White, Black gradient effect on it.
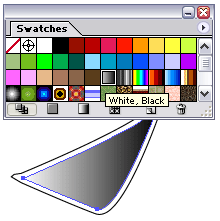
Note: Go to the menu bar Window > Swatches to open your Swatches palette.
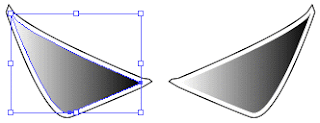
Step 9
Now, press V to select the eye on the left side. Repeat Step 8 to remove the outline stroke and apply the gradient. You should have something like this:-
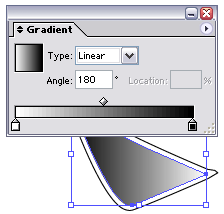
While the eye is still on selected, go to Gradient palette or press F9. Set Angle: 180 and press ENTER.
Step 10
Select both of the eyes offset path. To do it, click on the left offset path and while pressing the Shift key, select the right offset path.
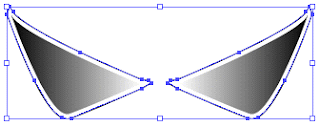
Then, once again, repeat Step 8 to remove the outline stroke and apply the gradient effect. You should have something like below:-
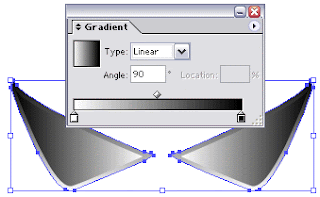
While the offset path is still on selected, go to Gradient palette or press F9. Set Angle: 90 and press ENTER.
Step 11
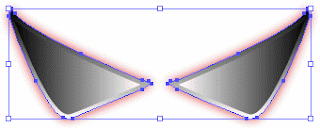
Next, we gonna apply some glow effect for the offset path. Go to Effect > Stylize > Outer Glow…You’ll see the Outer Glow window. Click the faded yellow box to change the color. Enter CC0000 in the # box.

Press ENTER and press ENTER once again. You’ll get something like below:-
Ok, it’s done for the eyes. Next, for the background.
Step 12
Select the Rectangle tool or press M and click once at the artboard. You’ll see a popup window. Enter this value. Width: 350px and Height: 175px and press ENTER.
Then, apply the White, Black gradient effect on it.
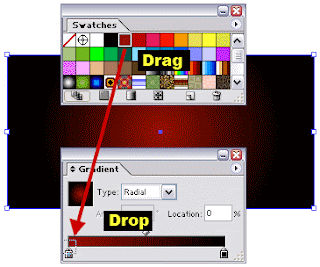
Now, go to your Gradient palette or press F9. Set the Type: Radial. Then, drag the red color from Swatches palette to the left handler of the Gradient palette. See below:-
Finally, right click on our background image > Arrange > Send to Back or just press Ctrtl+Shift+[.
Our final result:-

Yeahh..that’s all and hope you enjoy this tutorial. If you want to add the Spiderman 3 font, just download the Homoarakhan Font.


1 comment:
thanks so much for your help! now i finally understand HOW to use the pen tool! :) all the other tutorials just assume you know it :P
tiff!
Post a Comment