Pages

Blog post updated : no update

Wednesday, January 30, 2008

Numbered Google results

Hmm..just a simple Google tip for today. Last time I've posted about numbered MSN results and today I just found a way to numbered the Google results.

Just install this javascript and DONE. As simple as that.

And oh, ya. This script was working on Firefox (not sure about IE) with the Greasemonkey has been installed on it.

Now go to Google and search for any keywords. Your results page should be numbered right now (see image above).

That's all. Yeah!!!

See more Google tips and tricks.

Monday, January 28, 2008

Inside a working hard drive (video)

Ok, check out this cool video. Maybe some of you out there really want to know what's going on inside your computer hard drive. Yeahh!


Inside A Working Hard Drive - Watch more free videos

Saturday, January 26, 2008

Blogger - How to make a clickable post titles?

If you're using a classic Blogger template like me, you will notice that you cannot click the post title to go to the post page. Luckily, there is a little trick which you can apply to make your post title to be clickable. I've applied it in this blog. Try to visit my homepage and click on my post title. Hehe..

Ok, simply follow these tips:-

For New Blogger:-

It's pretty simple for New Blogger. Just go to your Dashboard. Go to Settings > Archiving > and Enable Post Pages? set to Yes. Click Save Settings button. DONE.

Go to your blog and refresh them. By now your post titles should be clickable.

For Classic Blogger:-

Step 1

First thing first enable your post pages. Go to Dashboard > Settings > Archiving > and Enable Post Pages? set to Yes. Click Save Settings button. (see image above)

Step 2

Then go to your Edit HTML page. Dashboard > Template > Edit HTML. Find this code:-

<BlogItemTitle>
<h3 class="post-title">
<BlogItemUrl><a href="<$BlogItemUrl$>" title="external link">
</BlogItemUrl>
<$BlogItemTitle$>
<BlogItemUrl></a></BlogItemUrl>
</h3>
</BlogItemTitle>

Ok, now replace them with this code:-

<BlogItemTitle>
<h3 class="post-title">
<a href="<$BlogItemPermalinkURL$>" title="<$BlogItemTitle$>">
<$BlogItemTitle$></a>
</h3>
</BlogItemTitle>

Save your template and DONE. Refresh your blog and by now you should have a clickable post titles.

I think that's for all for now. Hope this tip will be useful for you guys. Yeahh!!

Tuesday, January 22, 2008

Make Scratch Proof CD

Hmm..maybe I should try this trick to protect my cd/dvd. Hehe..


Make Scratch Proof CD - Watch more funny videos here

Monday, January 21, 2008

Illustrator tutorial – How to apply the gradient effect?


Ok, today we’ll learn how to use the gradient tool in Adobe Illustrator. It’s just a basic tutorial for beginner anyway. Gradient tool is a great tool in Illustrator and it’s really important to create a great gradient effect in graphics design. I also have used it in my previous Illustrator tutorial. Ok, here we go!

Software: Adobe Illustrator CS

Step 1

Open your Illustrator program and create new document. Set Size: Custom, Units: Pixels, Width: 500, Height: 500 and Color Mode: RGB.


Step 2

Click the Type Tool or press T and type anything on the artboard. Right click to the text and set Font: Verdana Bold, Size: 48. It should be look something like below:-


Note: I will use a text as an example in this tutorial instead of rectangle or any shape. Once you can apply this effect on text, it will get easier for you to apply it on any shapes. (the text was zoom at 150%)


Step 3

While the text is still on selected, go to Object > Expand… Keep the Object and Fill checkbox in checked and click Ok.


You'll get something like below:-


Step 4

Ok, now go to Swatches palette (Window>Swatches) and apply the gradient effect to the text.


Wow, it’s really great. Is that all? Of course not. We gonna change that default white, black color to another color. Ok, let's go to the next step.


Step 5

While the gradient text is still on selected and the Swatches palette is still on the artboard, open the Gradient palette (Window>Gradient or F9). Drag the red color from the Swatches palette (or any color) and drop it to the 2nd gradient slider (the one that have black in color). See image below:-


Set the Angle: 45 and you should have some thing like below:-


If you drag the red color and drop it beside the 2nd gradient slider (the black one) you’ll get something like below:-


Note:

1. Location: 70% is the location of the red slider or handler. Click to the small triangle-rectangle icon to know the location of the handler.

2. Try to drop more color and see how it looks like. Set the Gradient Type: Radial instead of Linear and move the handler left or right. And try a different angle value.

3. If the color you’re looking at is not on the Swatches palette, you have to open the Color palette (Window>Color or F6). For example, if you want to change the black handler to dark blue, click to the black handler. Then manually enter the RGB value in Color palette. E.g R: 0, G:51 and B: 102. You also can use the RGB spectrum below it. For more info about RGB color value, visit RGB Color Chart or RGB Color Codes website.

4. To get rid of the handler that you've just added, just drag it to the bottom of the Gradient palette.

Ok, the next steps are optional. I will show you how to apply gradient effect separately on each character using the Gradient Tool (G).


Step 6

Select the gradient text that we have just created. Go to Object>Ungroup (Shift+Ctrl+G).


Step 7

Ok, final step. Click the Selection Tool (or press V) and select any character that you want to make a change. Then, select the Gradient Tool (or press G). Click on the top left of the character (while holding the left mouse click), drag it to the center middle and release the mouse click. You should have something like below:-


Try to apply it to another character and use a different direction. Finally apply some drop shadow (Effect>Stylize…>Drop Shadow…) to the gradient text or anything you want. DONE.

This is my final outcome:-


Maybe next time I’ll show you how to create a wave effect on text using Illustrator. Hehe..

Update: I've created a post on how to make a wave text effect in Illustrator. :)

Have a nice day!!!

Friday, January 18, 2008

Computers In 2020?

Well, what will computers look like in the year 2020? Yeahh..check out this video!


Computers In 2020 - The funniest bloopers are right here

Thursday, January 17, 2008

Fancy Numbered Tabs - Numbering Firefox tabs

Maybe some of you already know that you can access a Firefox tab easily by pressing the Ctrl + [1-9] on your keyboard.

This feature might be useful if you only open 2 or 3 tabs. But how about 6 to 7 tabs? It's quite difficult to remember each tab position and maybe you'll just ignore this feature end up using your mouse click instead.

Luckily, there is a great Firefox extension that will be able to numbered your tab.

Fancy Numbered Tabs will replaces the close tab graphic with numbers to help with quick tab navigation via Ctrl + [1-9]. No worry, you're still be able to close the tab by clicking the number tab graphic.

This extension was really useful for me as I can switch to a specific tab more faster.

Feel free to install Fancy Numbered Tabs.

By the way, this addon is incompatible with:
  • Any extension that overwrites the close tab button code (ColorfulTabs, Some themes)
  • Any extension that overwrites the Firefox default shortcuts of Ctrl+[1-9] and Alt+[1-9] (SpeedDial)
That's all. Yeahh!!!

Tuesday, January 15, 2008

USB powered fan (video)

Find out how to make a USB desktop fan. Cool!!!


USB POWERED FAN - The funniest videos clips are here

Saturday, January 12, 2008

Numbering the MSN results page

I never know if this is useful for you guys. But for me, it was really useful to help me checking my blog ranking or position in MSN. Unlike Yahoo, MSN search engine doesn't provide any number beside it results. It would take you a lots of time if you want to know the position of any website. Even Google itself has numbered their results in their Google.com/ie page.

Ok, this is how you can numbering the MSN search engine results page (SERP):-

Step 1

Right click the URL below > Bookmark This Link... Click here if you can't see the link.


See image below:-
And place it inside your Bookmarks Toolbar. To enable Bookmarks Toolbar in Firefox, go to View > Toolbars > Bookmarks Toolbar.

Note: For IE user, right click URL > Add to Favorites and click OK. You'll see the favorites link inside your Favorites menu bar.

Step 2

Your bookmark link should be looks like this:-

Ok, now for the interesting part. Go to MSN and search for any keywords. Click the bookmark link that we've just created and tadaa!! Your MSN results page right now should be numbered.

Yeahh..it's quite simple and easy anyway. By now, you should be able to save a lot of time to know your website position in MSN.

Quick Firefox Tips:

To move an item/link/folder in Bookmarks Toolbar, press SHIFT key, left mouse click to the item and move it to the left or right.

That's all for today!!!

Wednesday, January 9, 2008

Rapidshare premium link generators that's working

Yeah..I saw a lot of bloggers posted about this stuff. If you search on Google using "free rapidshare premium link generator" keywords, you'll get a tons of results. I think that I've tried more than 20 websites and this number will keep increasing because I used Rapidshare almost everyday to download a files.

I expect you already know about Rapidshare.com. It was a file sharing hosting service that allow you to share your files with other people in this world. With just a simple Google search terms, you'll get a direct download links from other people that shared their movies, games, software etc. And it's free!!! But there are some download limitation for a free Rapidshare user. You have to wait 2 or 3 hours to download another file and it depends on the size of file that you have downloaded before that.

Ok, I think that's all for intro..hehe. Here is the list of websites that currently working to generate the Rapidshare premium link for free. Enjoy!!

1. Gettyfiles.com (Online/working)
  • Download limit: 2 files/day
  • You have to rename the finished downloaded file name, download.php according to your Rapidshare link details.

2. RSRacer.com (Offline/not working)
  • Download limit: 5 files/day

3. Very RapidShare (Online/working)
  • Download limit: 3 files/day
  • Download their Promotion code to have 5 additional daily downloads.

Note: I will update this post regularly (add some new website) and inform you whether the links is still works or not.

By the way, if you get:-
  • A file less than 5 kb gets downloaded this means that their rapidshare bandwidth is full for that day.
  • Something like Duplicate entry '#no' for key 1, just keep trying. You'll get the download link at the end.

Rapidshare Tips:-

1) If you're a free member, you can get a free one month Rapidshare premium account by collecting a premium points. You will get a points once there are people downloads your files. 10,000 points = 1 Month of free premium account.

2) If you read in the comment box in other blogs something like "here’s some free rapidshare accounts list and share it with others and don't change the passwords" and they give their Rapidshare link, believe me, most of them are fake. They just want to collect a premium points. Haha..

I think that's all for today and hope no comments as above. Yeahh!!!

Friday, January 4, 2008

Windows XP - Edit item/shortcut icon on Quick Launch bar

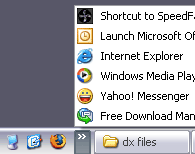
Yea it's true, you can modify or add an item to your Quick Launch bar (image above). You can simply drag and drop the shortcut icons onto it or for some Win XP user, they prefer to open the Quick Launch folder and edit it in the normal explorer window.

Open your Run windows (Windows + R), insert %appdata%\Microsoft\Internet Explorer\Quick Launch and press ENTER.

You should be able to see the Quick Launch folder right now and you can start add, delete or modify any existing shortcut icons in it. The newly created shortcut should be reflect in the Quick Launch area in the Taskbar.

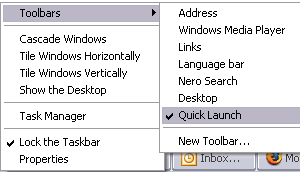
If your Quick Launch bar is not displayed, right-click an empty area on the taskbar > Toolbars and click Quick Launch.


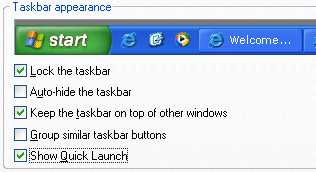
Another way to enable your Quick launch is right-click an empty area on taskbar > Properties and check the Show Quick Launch check box.

With the one click feature, Quick Launch bar makes it easy to access frequently used programs like Firefox, Media Player, your PacMan game or anything. Besides, with one click on Show Desktop icon, you can minimizes all the programs on your desktop.

I hope this tip useful for you guys. That's all....Yeahhh!!!

Credits: WinXPTutor

Wednesday, January 2, 2008

 
Powered by Blogger