Pages

Blog post updated : no update

Saturday, May 24, 2008

Customize your own Swatches palette in Illustrator

Ok, just a simple Illustrator tip for today. Maybe some of you have been wondering on how to create your own color or swatches palette in Illustrator. This tip is useful whenever you’d like to use other custom colors for your shape over and over again. Besides, it will come in handy when you want to use it as your gradient colors.

This is how it’s done.

Step 1

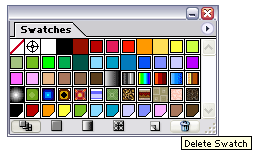
Open your Illustrator program and go to Swatches palette (Window > Swatches). By default, Illustrator will open up your Default_RGB / Default_CMYK palette in your Swatch Library.


Step 2

Start deleting some colors that you never use. Select one color and then press Ctrl/Cmd key to select other colors. Press the Bin icon on bottom right to delete it. Click Yes if you see a message box.


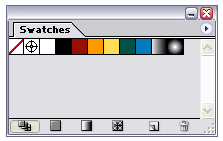
You’ll get something like this.


Note: There is no need to worry when you’ve deleted those colors because you can load them again by pressing the arrow button on the top right > Open Swatch Library > Default_RGB / Default_CMYK.


Step 3

Now visit any website on the net that offer free color palettes to get your desired color. For example, COLOURLovers website. Drag the color palette image directly from your browser into your artboard.


Step 4

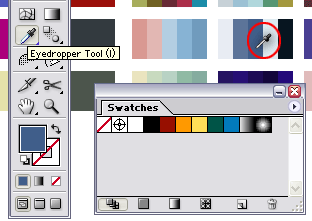
Now by using the Eyedropper tool, our job has come in handy. Select the Eyedropper Tool or just press I and then click to the color palette image.


Step 5

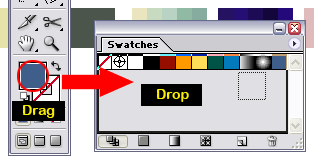
After that, just drag the color from your Fill tool and drop it directly to your Swatches palette. That’s all, the trick!
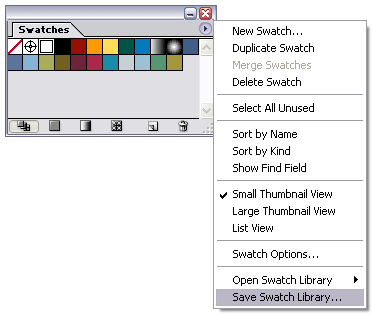


Step 6

Repeat Step 5 to add other colors. Click the arrow icon on the top right > Save Swatch Library... Just save it as myswatches.ai and done.


To use it soon or later, you have to load it on Open Swatch Library > myswatches.ai. Now, it’s really easy to add another color when you want to use the gradient tool.

That’s all for today and hope you enjoy this tip. Yeahh!!!

Saturday, May 17, 2008

Illustrator tutorial - Abstract colorful waves


Click image to view a full size.

Abstract design was really great. Its created a unique experience in the eyes of designers and a different impressions among the people who saw the design. And today, we will learn on how to create the abstract colorful waves in Illustrator using the Blend technique. This is a good practice for a newbie out there as we’re using a pen tool in this tutorial.:)

Software: Adobe Illustrator CS

Step 1

Create New Document with any Artboard setup and select RGB Color for Color Mode. As for this tutorial, I used 1024px x 768px setting.


Step 2

Let’s get started by creating a simple radial gradient background. Select Rectangle Tool or just press M and click once anywhere on the artboard. You’ll see a popup window and enter Width: 1024px and Height: 768px (depends on your artboard setting) and OK.

Apply a gradient color on it by clicking this tool and remove the stroke color. Go to Gradient palette (F9), set to Type: Radial and blue (#9FBFDF or 159, 191, 223) to white gradient.

Go to Align palette (Shift+F7) , click on Horizontal Align Center and Vertical Align Center. Make sure you select Align to artboard by pressing the arrow button beside it.

You may have something like below.


Note: My artboard size was scaled to 40% as Blogger will automatically resize my image to 400px x 400px :(


Step 3

Go to Layers palette (F7) and lock Layer 1. Create New Layer.


Step 4

Grab your Pen Tool or press P and then set the stroke color to black and no fill color. Go to Stroke palette (F10) and set Weight: 30pt.

Draw two lines like below:-


Pen tool tip: After drawing the first line, press Ctrl/Cmd and click outside the line area to release the anchor point connection and then draw the next line.

Note: It was ok if you don’t draw something as above. Remember, it’s just an abstract design and for newbie, just click and drag the pen tool on the artboard (I also did it before..hehe) to make a curve. Keep practice until you master the tool.


Step 5

Select our two lines, go to Object > Expand. Just click OK if you see a message box.

Click on Direct Selection Tool or just press A. Go to the starting point of one of our line and select one anchor point right there.


Click and drag the selected anchor point over the top of next anchor point beside it and release your click.


Step 6

Repeat Step 5 to the other three starting and ending points of our line to create a sharp ending point. You should have something similar as below:-


Step 7

Press V and select both of our lines. Go to Object > Blend > Blend Options…Enter Spacing: Specified Steps and 15. OK.


Then go to Object > Blend > Make. You’ll get something similar as below:-


After that, go to Object > Expand and just press OK. Go to Object > Ungroup. Repeat this step (ungroup) until you cannot ungroup it anymore.


Step 8

Now for the important part. Apply a linear gradient color onto this shape by clicking the color on Swatches palette (Window > Swatches) and dropping it to the Gradient palette (F9) - See my gradient tutorial in case you don’t know how to do it.

You may use any four colors (or more) to apply on it. Anyhow, I used these color settings Yellow (#FEDE58 or 254, 222, 88), purple (#CD6DBB or 205, 109, 187), blue (#A9CFF1 or 169, 207, 241) and green (#A3C380 or 163, 195, 128).


To see a magic, go to Transparency palette (Shift+F10) and set to Multiply.


Woww! It looks great.


Step 9

Select all our shape and go to Object > Group. Make 2 or 3 duplicates and set Transparency Opacity 20%. Rotate or resize them using your creativity.


Step 10

Now, we’d like to create some supporting element into our shape. You might see how to create this shape on other website before.

Lock Layer 2. Create New Layer.

Grab our Pen Tool (P) one more time and draw two lines like below. Apply a red color for the first line, white color for the second one and no fill color for both of them.


Go to Object > Blend > Make. Set the Transparency Opacity: 30.


Step 11

Ok, final step. Repeat Step 10 to create another one or two of our “wire wave” using different colors. Add some text, logo or anything into our design. Be creative and use your imagination.

Our final result:


Click image to view a full size.

To be honest, I also never know how the "wave" would be looks like until it comes to Step no 8. I designed the image and wrote about it at the same time. Hehe..You may explore and experiment more on this technique, combine it with other effects and come out with more stunning results than me. Coz I’m pretty sure that you guys are a creative and most experience designer!

That’s all for today..Yeahh!!!

Saturday, May 10, 2008

dx-xel.net’s new design

Fuhh…after struggling for over 1 month, so here it is, my new blog design. I called it Xel-white because it has a lot of white spaces. :) It’s maybe not my best design but I think that this layout is much better than the previous one (flat banner/logo, unattractive layout etc). Just my sense.

By the way, this time I’ve designed my new blog’s logo and added some illustration on the footer using the trendy circles element. I also have created my own web icons. Previously, I’ve used the FamFamFam Silk Icons.
Thus, there are really not many changes in the layout interface. I still prefer to use the 3 columns layout and the menu structure is remaining the same.

At first, I’d like to make a full illustration image for my blog banner. But, after thinking for a while that this blog is not fully a design blog, so I decided to make just a simple and plain banner as well. Maybe I need to create another blog and focus on design only. Hehe..

Other than that, I’ve also updated my archives, resources, about and contact page. I’ve to admit that I’m not really good when it comes to CSS. But so far, this layout is compatible with Firefox 2.0+, IE6 and Safari browser.

Until then, I hope you guys enjoy this new layout and some feedbacks are much appreciated.

That’s all. Yeahhh!!!
 
Powered by Blogger