 Ok guys, let's go for Illustrator tutorial. Today I'd like to show you how to create a 3D logo easily using 3D effect in Illustrator. I knew that maybe some of you guys has been thinking that -- creating 3D logos was really hard and complicated. No way. I promise you, at the end of this tutorial you'll never know that creating 3D logo is just a piece of cake! Ok, here we go!
Software: Adobe Illustrator CS
Step 1
Open your Illustrator program. Create a new document with any Artboard Setup and select RGB Color for Color Mode. In this tutorial, I've used 500px x 500px artboard setup.
Step 2
Select the Type Tool (T) and type 'X' in the artboard (I use the Broadway font in this tutorial). Select the 'X', right click and set font size: 72. Fill in the blue color on it. You'll get something like below:-
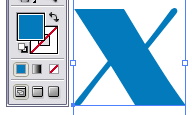
Note: Image zoom-in to 200% (Ctrl + +).
Step 3
Select the 'X' and go to Effect > 3D > Extrude & Bevel. Click on Preview on the right sidebar. Set the Extrude & Bevel, Extrude Depth: 30 pt. Leave everything as default and click OK (see below).


Step 4
Select our 3D 'X', go to Object > Expand Appearance. You will see the object will break apart. Next (while the 'X' was still selected) go to Object > Ungroup (Ctrl + Shift + G). You need to do this step(Ungroup) up to 4 to 5 times to break all our 3D object perfectly.

Note: You will know the object was fully break apart if you can select on a small part the image (see above image).
Step 5
Select the Direct Selection Tool (A). Press the Shift key, and select all the shadow image of our object. After you have done that, go to Object > Group (G). You will have something like below:-

Optional: Look closely at the 'X' color, it has dark blue once you applied the 3D effect on it. So I'm gonna change that color to #027ABB or 2, 122, 187 for RGB.
Step 6
Go to Swatches palette (Window > Swatches) and apply the White, Black gradient color on the shadow.
You will get something like below:-
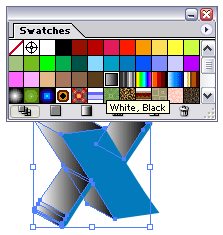
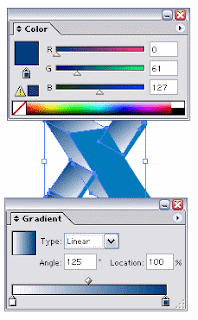
Now we gonna change that Black shadow color to Blue. Open your Color palette (F6) and Gradient palette (F9).
To change the Gradient slider to blue, click the small triangle-rectangle button on the right and just right after that enter R:0, G:61 and B: 127 as below.
And don't forget to set the gradient Angle: 125 and press Enter.
Step 7
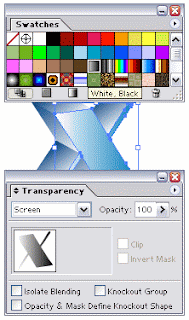
Copy (Ctrl + C) the original 'X' (the one that was in front) and paste it in front (Ctrl + F).
Click on the duplicate 'X', apply the black-white Gradient color on it. Go to Transparency palette and set to Screen.
Step 8
Ok, final step. While the duplicate 'X' is still on selected, go to Gradient Tool or press G. Drag your cursor from top left to the center of the duplicate 'X'. See below:-
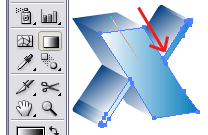
You'll get something similar like this:-

Move the duplicate 'X' to the top left and you may resize it a little bit.
Our final result:-

Some of other result with different color settings:-

And here are some other shapes I created using the similar technique:-
 Feel free to drop any comments if you do not understand or have better ideas. That's all!!
Credits: 3D Logo - Illustrator tutorial by Nick La
Thanks to NLBerg for the comment. I've placed the related images on Step 7 and 8.
No comments:
Post a Comment