
Ok guys, this is the simple tutorial ever. Hehe..The Pathfinder Tool in the Adobe Illustrator is very useful when you want to customize your shape rather than the normal shape such as rectangle, rounded rectangle and so on.
In this tutorial, we will learn on how to draw the folder icon image.
Software: Adobe Illustrator CS
Step 1
Open your Illustrator and create new document with 500px x 500px Artboard setup. Make sure you select RGB color for color mode.
Step 2
Make your fill color look like this first (Green: #006600 or 0,127,15). Select the Rounded Rectangle Tool
  and draw two shapes and place them together like below.
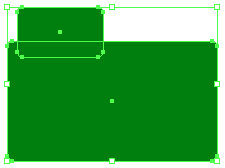
Draw the big one:- Click once at the artboard (you’ll see a popup) and set Width:210px, Height: 120px, Corner Radius: 5px.
Draw the small one:- Same like drawing the big one but set Width:86px, Height: 50px, Corner Radius: 5px.
Step 3
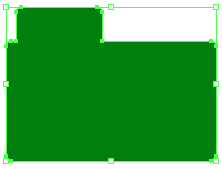
Select both shapes and go to Pathfinder Tool (Shift + F9). Click to the Click to shape area and then click Expand
  . You will get something like below:-
Step 4
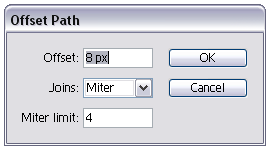
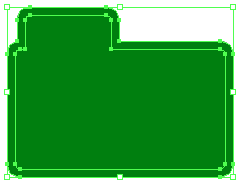
Ok, select our new shape, go to Object > Path > Offset Path…Set Offset: 8px, Joins: Miter, Miter limit:4
You’ll get something like this:-
Step 5
Select the Line Segment Tool (\) and draw a line like below:-
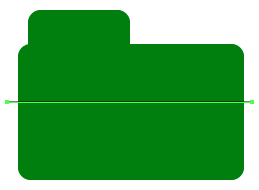
Step 6
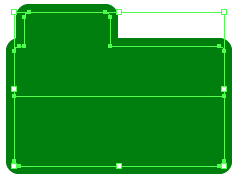
Select the original shape and the line by pressing the Shift key. Go to the Pathfinder Tool once again and click the Divide tool .
.
Step 7
Click the Direct Selection Tool (A) and select the top part of the divided shape. Now, apply the White, Black gradient on it.
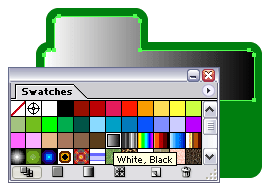
Note: Go to menu bar Window > Swatches if your Swatches palette not appear.
Then, go to Gradient palette (Window > Gradient of press F9) and set the Angle: 270 and press ENTER. See below:-
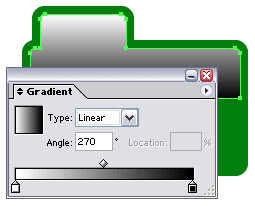
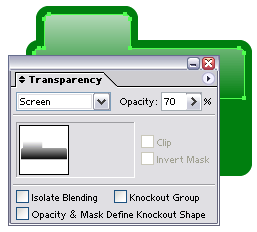
And after that, go to Transparency palette (Window > Transparency or press Shift + F9) and set to Screen and Opacity: 70.
Step 8
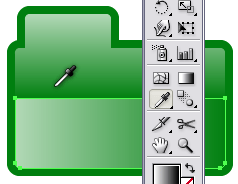
Ok, now, using the Direct Selection Tool (A), select the bottom part of the divided shape. Click the Eye Dropper Tool (I) and click on the top part of the shape (the one that we have applied the gradient). We would like to apply the same gradient effect on it.
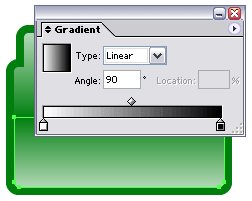
Then, set the Gradient Angle: 90 and press ENTER.
Step 9
Ok, almost finish. While the bottom part of the shape was still on selected, click the Gradient Tool or press G. Then, while pressing the Shift key, click at the bottom of the shape and drag it to the top a little bit.
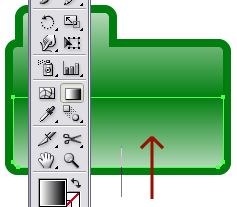
You’ll get something like below after releasing your left click:-

Step 10
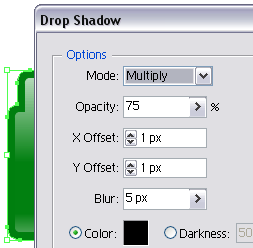
Final step. Click on Selection Tool or press V and select the offset path (the green one). Go to Effect > Stylize > Drop Shadow... Set X Offset:1px, Y Offset:1px, leave everything as default and press OK. DONE.
Our final result:-

And of course, you can change the green color to any color you like or play around with the Opacity value on the Transparency palette.
Some other shapes I created using the similar technique.

That's all for today and have fun.
Yeahhh!!!
In this tutorial, we will learn on how to draw the folder icon image.
Software: Adobe Illustrator CS
Step 1
Open your Illustrator and create new document with 500px x 500px Artboard setup. Make sure you select RGB color for color mode.
Step 2
Make your fill color look like this first
 (Green: #006600 or 0,127,15). Select the Rounded Rectangle Tool
  and draw two shapes and place them together like below.
Draw the big one:- Click once at the artboard (you’ll see a popup) and set Width:210px, Height: 120px, Corner Radius: 5px.
Draw the small one:- Same like drawing the big one but set Width:86px, Height: 50px, Corner Radius: 5px.
Step 3
Select both shapes and go to Pathfinder Tool (Shift + F9). Click to the Click to shape area
 and then click Expand
  . You will get something like below:-
Step 4
Ok, select our new shape, go to Object > Path > Offset Path…Set Offset: 8px, Joins: Miter, Miter limit:4

You’ll get something like this:-

Step 5
Select the Line Segment Tool (\) and draw a line like below:-

Step 6
Select the original shape and the line by pressing the Shift key. Go to the Pathfinder Tool once again and click the Divide tool
 .
.
Step 7
Click the Direct Selection Tool (A)
 and select the top part of the divided shape. Now, apply the White, Black gradient on it.
Note: Go to menu bar Window > Swatches if your Swatches palette not appear.
Then, go to Gradient palette (Window > Gradient of press F9) and set the Angle: 270 and press ENTER. See below:-

And after that, go to Transparency palette (Window > Transparency or press Shift + F9) and set to Screen and Opacity: 70.

Step 8
Ok, now, using the Direct Selection Tool (A), select the bottom part of the divided shape. Click the Eye Dropper Tool (I) and click on the top part of the shape (the one that we have applied the gradient). We would like to apply the same gradient effect on it.

Then, set the Gradient Angle: 90 and press ENTER.

Step 9
Ok, almost finish. While the bottom part of the shape was still on selected, click the Gradient Tool or press G. Then, while pressing the Shift key, click at the bottom of the shape and drag it to the top a little bit.

You’ll get something like below after releasing your left click:-

Step 10
Final step. Click on Selection Tool or press V and select the offset path (the green one). Go to Effect > Stylize > Drop Shadow... Set X Offset:1px, Y Offset:1px, leave everything as default and press OK. DONE.

Our final result:-

And of course, you can change the green color to any color you like or play around with the Opacity value on the Transparency palette.
Some other shapes I created using the similar technique.

That's all for today and have fun.
Yeahhh!!!
No comments:
Post a Comment