Pages

Blog post updated : no update

Thursday, August 30, 2007

Blogger - Adding Google sitemap

Hmm..actually, this post will only redirect you to a great blogger tips by Peter Chen. He will guide you step-by-step on how to add Google sitemap to your blog.

Feel free to read this tips.

The important point I've got through that tutorial was for the new blogger, you have to insert http://BLOGNAME.blogspot.com/atom.xml if they ask for Sitemap URL.

Note: Change the BLOGNAME to your own blog name.

Besides, maybe you'd like to see the Google Sitemap page.

Further reading: What is a sitemap file?

Wednesday, August 29, 2007

How to rename Recycle Bin in Windows XP?

Ok, just a quick simple XP tips for today. Last time, I wrote a post about removing Recycle Bin icon from desktop. Maybe you just want to rename your Recycle Bin instead of deleting it.

Take this simple steps:-

Open your Registry Editor. Go to Run (Windows+R), type regedit and press ENTER.

Then go to:-

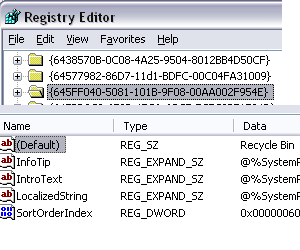
HKEY_CLASSES_ROOT/CLSID/{645FF040-5081-101B-9F08-00AA002F954E}

Note: For faster navigation, press C on your keyboard while selecting the HKEY_CLASSES_ROOT folder.

You may have something like below:-

Double click the (Default) and you will see the Value Data: Recycle Bin. Change the Value Data to Trash or whatever you want.

Click OK and close your Registry Editor. Restart your PC. By now, your Recycle Bin icon's name should be changed.

Yeahh..that's all!

Credits: freePCtech

Tuesday, August 28, 2007

Keyconfig - Change Firefox's keyboard shortcuts

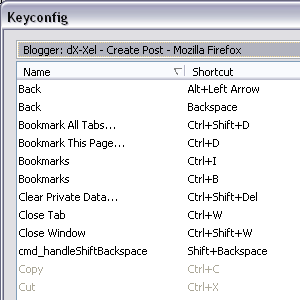
Hmm...maybe you already read about my Firefox's keyboard shortcuts. Believe or not, you can modify or change the shortcuts using the Keyconfig extension.

After you've installed this extension, the Keyconfig navigation will be located under your Tools menu bar or just simply press Ctrl+Shift+F12 on your keyboard.

By using this extension, you also can disable the shortcuts entirely. It even lets you change keyboard shortcuts owned by other extensions.

Feel free to install the Keyconfig extension.

Credits: DownloadSquad

Monday, August 27, 2007

AVG - Free Anti-Virus software

AVG is a great simple Anti-Virus software. Lots of my friends using this software because of its simplicity and of course, the ability to detect and remove a lot of viruses, trojans, spyware etc.

Some info about AVG Free Edition:-

License Type: Free
Price: Free
Operating Systems: Windows 2000, Windows 9.x, Windows Me, Windows XP, Windows Vista
File Size: 23095KB
Author: Grisoft

Let see its protection levels:-

Anti-Virus
Protects you against viruses, worms and trojans.

Anti-Spyware
Protects you against spyware, adware and identity-theft.

Anti-Spam
Filters out junk email.

Firewall
Protects you against hackers and network intrusions.

Anti-Rootkit
Protects you against sophisticated rootkit attacks.

Yeahh..this software was really great, right? Feel free to download the AVG free edition.

See also a review on PC World and Softpedia.

Thursday, August 23, 2007

Advanced photo resizing software (video)

Just a cool stuff I got from Digg. It's about a great photo resizing and editing software. According to digger's comment, it can't be download yet and maybe it will be released soon. By the way, it seems that this software was pretty handy and really awesome.

Ok, check out this video:-


Well, maybe I'd like to have some soon. Hehe..

Wednesday, August 22, 2007

Download StarOffice for free in Google Pack

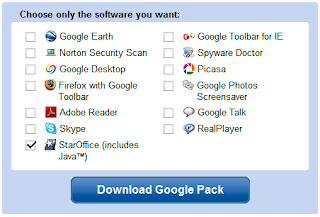
Yeahh..the StarOffice software was already added into Google Pack. It means that, you can download it just for free.

StarOffice was a great alternative for the word processing software. Besides, it also support for most Microsoft Office formats (except for the formats introduced in Office 2007), and also export documents as PDF out of the box.

Feel free to download the other free software in Google Pack.

That's all for today!

Credits: Google Operating System

Monday, August 20, 2007

Blogger - Showing related articles to your posts

Ok guys....first thing first..this widget is not created by me. It was originally created by Hoctro. Full credits and big thanks to him. This widget was became so important to me so far. If you click on one of my post, you'll see the related articles (on the same label) at the bottom of my post. You can see the original post here.

I think that I need to republish this article so that easy for me to make a reference in the future. I hope Hoctro don't mind. Hehe..

Before you done anything, make sure to save your template. Go to Template > Edit HTML and Download Full Template.

Ok, how do I do it?

Step 1

On your Blogger Dashboard, go to Settings > Site Feed. On Allow Blog Feed, select Full. Click Save Settings button at the bottom of the page.

Then, go to Settings > Archiving. On Enable Post Page?, select Yes. Click Save Settings button at the bottom of the page.


Step 2

Go to Template > Edit HTML. Click on Expand Widget Templates checkbox. Scroll down and find this code:-

<p><data:post.body/></p>


Step 3

Replace the code above with this one:-

<p><data:post.body/>

<b:if cond='data:blog.pageType == "item"'>
<div class='widget-content'>
<h3>Related Articles:-</h3>
<div id='data2007'/><br/><br/>
<div id='hoctro'>Widget by <u><a href='http://hoctro.blogspot.com'>Hoctro</a>

</u></div>
<script type='text/javascript'>

var homeUrl3 = "BLOGNAME.blogspot.com";
var maxNumberOfPostsPerLabel = 4;
var maxNumberOfLabels = 1;

<b:if cond='data:blog.pageType == "item"'>
maxNumberOfPostsPerLabel = 4;
</b:if>
<b:if cond='data:blog.pageType == "item"'>
maxNumberOfLabels = 1;
</b:if>


function listEntries10(json) {
var ul = document.createElement('ul');
var maxPosts = (json.feed.entry.length &lt;= maxNumberOfPostsPerLabel) ?
json.feed.entry.length : maxNumberOfPostsPerLabel;
for (var i = 0; i &lt; maxPosts; i++) {
var entry = json.feed.entry[i];
var alturl;

for (var k = 0; k &lt; entry.link.length; k++) {
if (entry.link[k].rel == 'alternate') {
alturl = entry.link[k].href;
break;
}
}
var li = document.createElement('li');
var a = document.createElement('a');
a.href = alturl;

var txt = document.createTextNode(entry.title.$t);
a.appendChild(txt);
li.appendChild(a);
ul.appendChild(li);
}

for (var l = 0; l < json.feed.link.length; l++) {
if (json.feed.link[l].rel == 'alternate') {
var raw = json.feed.link[l].href;
var label = raw.substr(homeUrl3.length+21);
var k;
for (k=0; k&lt;20; k++)
label = label.replace("%20", " ");
var txt = document.createTextNode(label);
var h = document.createElement('h4');
h.appendChild(txt);
var div1 = document.createElement('div');
div1.appendChild(h);
div1.appendChild(ul);
document.getElementById('data2007').appendChild(div1);
}
}
}

function search10(query, label) {

var script = document.createElement('script');
script.setAttribute('src', 'http://' + query + '/feeds/posts/default/-/'
+ label +
'?alt=json-in-script&amp;callback=listEntries10');
script.setAttribute('type', 'text/javascript');
document.documentElement.firstChild.appendChild(script);
}

var labelArray = new Array();
var numLabel = 0;

<b:loop values='data:posts' var='post'>
<b:loop values='data:post.labels' var='label'>
textLabel = "<data:label.name/>";

var test = 0;
for (var i = 0; i &lt; labelArray.length; i++)
if (labelArray[i] == textLabel) test = 1;
if (test == 0) {
labelArray.push(textLabel);
var maxLabels = (labelArray.length &lt;= maxNumberOfLabels) ?
labelArray.length : maxNumberOfLabels;

if (numLabel &lt; maxLabels) {
search10(homeUrl3, textLabel);
numLabel++;
}
}
</b:loop>
</b:loop>
</script>
</div>
</b:if>

</p>


Step 4

Change the BLOGNAME with your own blog name.

var homeUrl3 = "BLOGNAME.blogspot.com"; (e.g: dx-xel.blogspot.com)

Save your template and Done.


By now, if you click on one of your post, you will see the related articles at the bottom of your post.

You can change the value of this line:-

(The number of labels and posts that will displayed on your homepage). No need to modify this settings if you only want to show the related articles on your blog post.

var maxNumberOfPostsPerLabel = 4;
var maxNumberOfLabels = 1;


(The number of labels and posts that will displayed on your post page)

<b:if cond='data:blog.pageType == "item"'>
maxNumberOfPostsPerLabel = 4;
</b:if>
<b:if cond='data:blog.pageType == "item"'>
maxNumberOfLabels = 1;
</b:if>


Yeahh...I think that's all. If you have found any problems, please contact me or drop a comments.

Note: This widget was modified by me according to my current settings.

Saturday, August 18, 2007

Download dX-Vista Maniac (Wallpaper)

[ Download | 1024x768 ]

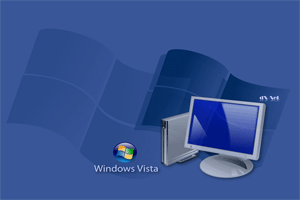
Ok, guys..another free wallpaper for your download. This time, it's Vista wallpaper. Again..don't ask me why I chose those name. And everything was done using Adobe Illustrator.

I'm using the Pen Tool in Illustrator to trace the Windows Vista's My Computer icon on that wallpaper. As you can see, it's maybe look easy, but it's kinda hard for me..hehe..

Ok..here are the details:

Name: dX-Vista Maniac
Type: Wallpaper
Dimensions: 1024 x 768
Theme: Windows Vista
File size: 147 KB
Date created: Aug 18, 07
Software: Adobe Illustrator
Color: Blue, Grey, White
Background Color:
  • HEX: #336699
  • RGB: 57, 86, 152
Extract the file using WinRAR.

That's all for today. Just drop a comment if you have something to say. Yeahh..

Friday, August 17, 2007

Windows XP - Convert FAT32 file system into NTFS

Ok guys...a simple Win XP tips for today. It's really easy to convert your Volume/Local Disk that have FAT32 (File Allocation Table) file system to NTFS (New Technology File System).

To view your drive file system, simply go to My Computer > right click on your drive and click Properties.

Take this simple steps:-

Step 1

Open your Command Prompt. To open it, press Window + R, type cmd and hit ENTER.


Step 2

Type convert D: /fs:ntfs and hit ENTER. That's all. I used the Local Drive D: as an example. Please note that you cannot convert your Local Drive where you placed your Operating System(OS) files on it (Default OS drive was on C:).


Why do you need to convert your volume to NTFS?

Ok..a quick lists of the advantages and also the disadvantages of using the NTFS.


ADVANTAGES of NTFS

Recoverability
The recoverability designed into NTFS is such that a user should seldom have to run a disk repair program on an NTFS volume. NTFS guarantees the consistency of the volume by using standard transaction logging and recovery techniques.

In the event of a system failure, NTFS uses its log file and checkpoint information to automatically restore the consistency of the file system. For more information about recovering your system, restoring data, and creating an emergency repair disk (ERD), please visit this page.

Compression
Windows 2000 supports compression on an individual file basis for NTFS volumes. Files that are compressed on an NTFS volume can be read and written by any Windows-based application without first being decompressed by another program. Decompression happens automatically during the read of the file. The file is compressed again when it is closed or saved.

In addition, formatting your volumes with NTFS instead of FAT16 or FAT32 provides the following advantages:
  • There are some Windows 2000 operating system features that require NTFS.
  • Faster access speed. NTFS minimizes the number of disk accesses required to find a file.
  • File and folder security. On NTFS volumes, you can set file permissions on files and folders that specify which groups and users have access to them, and what level of access is permitted. NTFS file and folder permissions apply both to users working at the computer where the file is stored and to users accessing the file over the network when the file is in a shared folder. With NTFS you can also set share permissions that operate on shared folders in combination with file and folder permissions.
  • Windows 2000 can format volumes up to 2 terabytes in size with NTFS.
  • The boot sector is backed up to a sector at the end of the volume.
  • NTFS supports a native encryption system called Encrypting File System (EFS), using public-key security to prevent unauthorized access to file contents.
  • NTFS functionality can be extended by using reparse points, enabling new features such as volume mount points.
  • Disk quotas can be set, limiting the amount of space users can consume on an NTFS volume.

DISADVANTAGES of NTFS

While NTFS is the recommended file system for users of Windows 2000, it is not appropriate in all circumstances. Disadvantages of NTFS include:
  • NTFS volumes are not accessible in MS-DOS, Windows 95, and Windows 98. Due to upgrades made to NTFS in Windows 2000, the advanced features of the Windows 2000 implementation of NTFS are not available in Windows NT 4.0 and earlier.
  • When very small volumes contain mostly small files, the overhead of managing NTFS may cause a slight performance drop in comparison to FAT.

That's all for today..I hope you enjoy this post.

Note:

1. You can use this tips to convert the FAT volume to NTFS.
2. You cannot convert the drive from NTFS to FAT or FAT32. To do this, you have to reformat you local disk or partition. Make sure you make a backup first.
3. To view the other convert commands, type help convert to your Command Prompt and press ENTER.

Credits: Microsoft, WinXpFix

Wednesday, August 15, 2007

Dancing Firefox?

I just got this cool Firefox stuff from SeeJay. Yeahh..that's true..Firefox really can dance. Don't you believe it? Check this out!

1. Open a New Firefox window (Ctrl+N)
2. Open two tabs in that window by pressing Ctrl+T twice
3. In one tab, copy and paste the following URL to the address bar, press ENTER and Firefox will start dancing crazily

chrome://global/content/alerts/alert.xul

4. To stop the dance press Ctrl+W and then right click on the Firefox in the taskbar and select maximize
5. Firefox will then stop the dance.

What do you think about that? If those thing was not enough, try to click the image below. You will see a real dancing fox!

That's all and have fun. Yeahhh!!!

Tuesday, August 14, 2007

Deviantart.com - Designer's world

Yeahh..Maybe you already knew about this cool website. Deviantart.com is one of the largest online community and the greatest place for all artist/designer from around the world.

What is exactly special about this website anyway? Woww...you can find a lot of creative and impressive artworks right here. There are a lot of experts, skillful and very talented person that you've never knew before.

It's not only browsing the web, but you also can download their artworks/designs for free. For example the desktop wallpapers.

Feel like browsing? Check out for these search terms:-
It was really cool right? You also can submit your own artworks once you have registered and become the member.

That's all for today. Yihaaa!!!

Monday, August 13, 2007

Blogger - Add page elements to blog header or post

Yet, another simple tips for blogger.com users. If you have used the default templates that was provided by blogger.com, you will noticed that you will absolutely cannot adding some page elements to your blog header or post.

Adding a page element to a blog header or post are a great things to do if you want to place an Adsense code. Besides, it'll become more handy if you want to add some tab menu or breadcrumb menu to your blog. Maybe next time I'll discuss about this.

Ok, check this out.


Add Page Elements to blog header

First, go to your Template > Edit HTML and find this code:-

<b:section class="header" id="header" maxwidgets="1" showaddelement="no">

then replace it with this code:-

<b:section class="header" id="header" maxwidgets="5" showaddelement="yes">

Save your template. Now, you can add 4 extra widgets or page elements to your header.

Note: It's not necessarily 5, maxwidgets='5', you can put any number you want. E.g: 6, 7 or 11.


Add Page Elements to blog post

Go to Template > Edit HTML and find this code:-

<b:section class="main" id="main" showaddelement="no">

and replace it with this one:-

<b:section class="main" id="main" showaddelement="yes">

Save your template. Now, you can add a page element just before or after your blog post.

Note: Just drag the page element that you have been created to the top of the post if you want it to be appear just before your blog post.

That's all for now. Happy blogging!!

Friday, August 10, 2007

Winrar archive file- How to encrypt and set the password?

Ok guys, another simple tips for today. It's really easy to encrypt and set the password to the Winrar archive files. Ok, take this easy steps.

Step 1

Download Winrar if you don't have one. Install it.


Step2

Select the file that you want to encrypt, right click > Add to "backup.rar".

(In this post, I will take the backup.txt file as an example)


Step 3

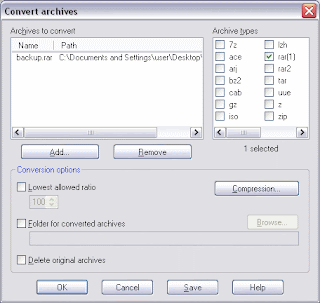
Then, you will see a file was created and called backup.rar. Open that file using Winrar. Go to Tools > Convert archives (Alt + Q) and you will see the Convert archives windows (see below).


Step 4

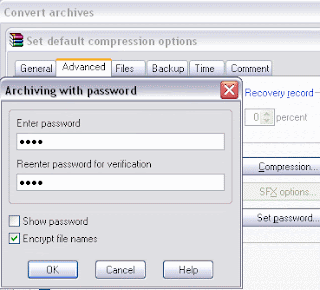
Click the Compression button and go to Advanced tab. Click Set password button. Enter your password and check the Encrypt file names (see below).

After that, press OK and OK again. Then, you will see the Convert popup message. Select Yes. Press OK.


Step 5

And just right after that, the window will prompt you to insert the password. Insert the password that you had been created in Step 4.

Note: The window will ask you to insert the password twice


Step 6

Click the Close button and close the Winrar window. Done.

Now you have set the password and encrypt the Winrar archive file. Whoever want to extract that file must know the password. Hehe..

Ok guys, that all for today. Yeahhhh....

Note: You can apply this tips to a single file or folder.

Wednesday, August 8, 2007

Gmail - Manage all your email accounts

Alright, a great simple tips for today. If you have your own domain email address (email@yourdomain.com) and you want to manage it by using Gmail, this tutorial might be useful for you. This guy will teach you step-by-step on how to configure your Gmail to manage your multiple email accounts.

Ok, feel free to read this post: Manage all your email accounts with Gmail.


Yeahhh!!

Tuesday, August 7, 2007

Windows XP - Task manager's performance tab

Ok, today I'd like to share the information of the task manager's performance tab in Windows XP. Yeahh..it's just a piece of information. Maybe it's quite boring for you guys (me too). But never mind, I still want to publish this post so that easy for me to make a reference in the future.

What is Windows Task Manager?

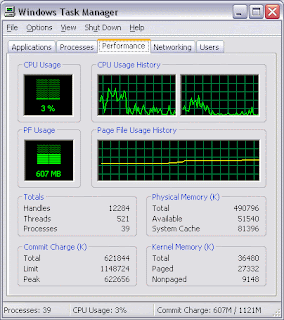
Windows Task Manager displays information about the performance of your computer and the programs and processes that are running on your computer. You can use Task Manager to start programs, to start or to end processes, and to view a dynamic display of your computer's performance.

There are 4 ways to start the Windows Task Manager:-
  • Go to Run (Windows+R), type taskmgr and press ENTER.
  • Press CTRL+ALT+DELETE, and then click Task Manager.
  • Press CTRL+SHIFT+ESC.
  • Right-click an empty area of the taskbar, and then click Task Manager.
and what is the Task Manager's performance for?

The Task Manager's Performance tab provides the best way to monitor the memory that has been used in your system.

Further info about Task Manager's performance:-

1. Total

Handles - Lets a program use system resources such as registry keys, fonts, and bitmaps. Sometimes, poorly written programs don't close their handles down when the program closes, leading to memory loss. As a practical matter, you won't need to monitor this number.

Threads - A discrete portion of a program executing a single task independently of other parts of a program. Again, as a practical matter, you won't need to monitor this number.

Processes - Reports on the number of programs and services (processes) currently running on your system. Monitor this to see whether you have too many programs and services running on your PC.


2. Commit Charge (K)

Total - The total amount of physical memory (RAM) and virtual memory (page file) currently in use, in kilobytes. The more programs, files, and data you have open, the greater your commit charge will be. The greater the commit charge, the more demands will be put on your system. To reduce the commit charge, close programs and files, especially large files.

Limit - Reports on the total amount of physical and virtual memory that is currently available for your PC, measured in kilobytes. To increase the limit, you can increase the Page File size (see article 4.9 "Optimize Your Swap File Size") or add RAM to your system.

Peak - Reports on the highest total amount of memory, measured in kilobytes, that has been in use during your current session. Check this value each session to see whether the Peak value is frequently at or near the Limit value. If it is, you need to increase your memory, by either adding RAM or increasing your Page File size.


3. Physical Memory (K)

Total - Displays the total amount of RAM in your PC, in kilobytes. This number can be confusing; to find out the amount of RAM in megabytes, divide it by 1,024.

Available - Reports on the total amount of RAM, in kilobytes, currently available. When available RAM is used up, your system begins to use its Page File.

System Cache - Reports on the total amount of RAM, in kilobytes, that is being used for the most recently accessed data and programs. Programs and data can be in the system cache even after they have been closed down; the PC looks to the system cache first when opening a program or file, since it can be opened from the cache faster than from the hard disk.


4. Kernel Memory (K)

Total - The total amount of memory, in kilobytes, in use by the primary components of the XP kernel. The kernel is the core programs and files that make up the operating system.

Paged - The total amount of memory in a Page File, in kilobytes, used by the primary components of XP.

Nonpaged - The total amount of memory of RAM, in kilobytes, used by the primary components of XP.


Tips:-

If the Total Commit Charge exceeds the Total Physical Memory, you probably need more RAM. When the Commit Charge is regularly higher than the Physical Memory available, it means that you have to regularly use a Page File, which slows your system down. Buy more RAM; it's inexpensive and will boost system performance.

Before running a memory-intensive application, use the Processes Tab to identify memory-hogging applications, and close them down. The Processes tab of the Task Manager lists every process and program in use and shows the total amount of memory each uses. Click twice on the Mem Usage heading on the tab to reorder the list of programs and processes so that those that require most memory show up at the top. Close down programs that you don't really need before running a memory-intensive application.

If the Peak Commit Charge is frequently at or near the Limit Commit Charge, you need to increase your memory. When this occurs, it means that your PC is frequently out of memory or close to being out of memory. Either add RAM or increase your Page File size.

Yeahhh..that's all. I hope this information was useful for you guys.

Credits: How to use Windows Task Manager?
Monday, August 6, 2007

VideoDownloader - Download video from Youtube.com

Currently, I'm using the VideoDownloader to download a video from Youtube. It's a handy Firefox extension I've ever used. Hehe..After you have installed this extension, you'll found a small icon, on the Firefox status bar.

To use it, simply go to Youtube and click any of the videos right there. And then, while the page is still loading, press the Stop button on your Firefox browser (this tips to make sure you can download the video more faster).

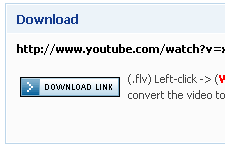
After that, click to the VideoDownloader icon(at the Firefox status bar) and you will see something like this:-
Click the Download Link button and you'll be able to start download the video immediately. Don't forget to rename the video file to get_video.flv or anyname.flv after the download has been completed.

To play the FLV files, feel free to download the FLV Player. You can also convert the FLV files to AVI, WMV, MPEG using the Replay Converter.

Other alternative to download the video from Youtube is using the Vixy.net: online video converter. Yeahhh!!

Saturday, August 4, 2007

Illustrator tutorial - Create 3D logo

Ok guys, let's go for Illustrator tutorial. Today I'd like to show you how to create a 3D logo easily using 3D effect in Illustrator. I knew that maybe some of you guys has been thinking that -- creating 3D logos was really hard and complicated. No way. I promise you, at the end of this tutorial you'll never know that creating 3D logo is just a piece of cake! Ok, here we go!

Software: Adobe Illustrator CS

Step 1

Open your Illustrator program. Create a new document with any Artboard Setup and select RGB Color for Color Mode. In this tutorial, I've used 500px x 500px artboard setup.


Step 2

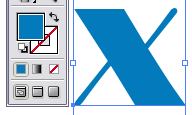
Select the Type Tool (T) and type 'X' in the artboard (I use the Broadway font in this tutorial). Select the 'X', right click and set font size: 72. Fill in the blue color on it. You'll get something like below:-


Note: Image zoom-in to 200% (Ctrl + +).


Step 3

Select the 'X' and go to Effect > 3D > Extrude & Bevel. Click on Preview on the right sidebar. Set the Extrude & Bevel, Extrude Depth: 30 pt. Leave everything as default and click OK (see below).


Step 4

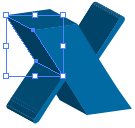
Select our 3D 'X', go to Object > Expand Appearance. You will see the object will break apart. Next (while the 'X' was still selected) go to Object > Ungroup (Ctrl + Shift + G). You need to do this step(Ungroup) up to 4 to 5 times to break all our 3D object perfectly.


Note: You will know the object was fully break apart if you can select on a small part the image (see above image).


Step 5

Select the Direct Selection Tool (A). Press the Shift key, and select all the shadow image of our object. After you have done that, go to Object > Group (G). You will have something like below:-


Optional: Look closely at the 'X' color, it has dark blue once you applied the 3D effect on it. So I'm gonna change that color to #027ABB or 2, 122, 187 for RGB.

Step 6

Go to Swatches palette (Window > Swatches) and apply the White, Black gradient color on the shadow.

You will get something like below:-


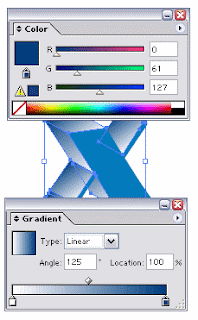
Now we gonna change that Black shadow color to Blue. Open your Color palette (F6) and Gradient palette (F9).

To change the Gradient slider to blue, click the small triangle-rectangle button on the right and just right after that enter R:0, G:61 and B: 127 as below.

And don't forget to set the gradient Angle: 125 and press Enter.


Step 7

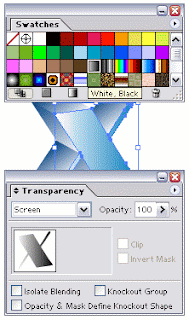
Copy (Ctrl + C) the original 'X' (the one that was in front) and paste it in front (Ctrl + F).

Click on the duplicate 'X', apply the black-white Gradient color on it. Go to Transparency palette and set to Screen.


Step 8

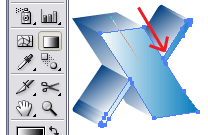
Ok, final step. While the duplicate 'X' is still on selected, go to Gradient Tool or press G. Drag your cursor from top left to the center of the duplicate 'X'. See below:-


You'll get something similar like this:-


Move the duplicate 'X' to the top left and you may resize it a little bit.

Our final result:-


Some of other result with different color settings:-


And here are some other shapes I created using the similar technique:-

Feel free to drop any comments if you do not understand or have better ideas. That's all!!

Credits: 3D Logo - Illustrator tutorial by Nick La

Thanks to NLBerg for the comment. I've placed the related images on Step 7 and 8.

Friday, August 3, 2007

Pixelmoon - Moon life fantasy

Hi guys, I just found this cool stuff. It's cool for me because this Pixelmoon page contains a lot of great images. The idea is simple. The webmaster ask you to design some simple .gif and .png image with a space theme and he will add them to that page.

If you are a designer like me, hehe..you probably love this one. By the way, if you want to contribute some image to this website, make sure your artwork is original. Besides, you can view your country's flag on the top of the page once your project has been accepted.

Other than that, you also can make the animated gif image as you can see at that web page. I'm not pretty sure what software did they used to create those image. I think some of them use Macromedia Flash to create the animation.

Maybe I'll send something to that website soon. It's really cool. Yeahhh!!

For further info, visit this Pixelmoon website.

Thursday, August 2, 2007

Blogger - Upload your files to Google Pages

Yeahh..This is another great tips for blogger.com users out there. Google Pages or Google Page Creator has provides a free service for you to upload your stuff. Currently I've uploaded the Windows Vista wallpapers into my Google Pages account. Besides, you may use it to upload your blog's favicon as well.

To use this service, simply login to Google Pages using your Gmail account. Go to the right sidebar and you will see the Uploaded Stuff menu. Click on upload > browse your file > open. That's all. As simple as that.

Google Pages provides 100MB space. From what I've read, you can only upload 9MB to 10MB file/upload. Means that, if you want to upload a 100MB file, you have to split it into 10 or 11 files.

The only problem with this service is, Google Pages has a limited bandwidth. Hmm..maybe someday we hope that Google can make this free service has an unlimited bandwidth. Hehe..
 
Powered by Blogger